Monday, April 17, 2017
How to Install GVIM a powerful text editor in Ubuntu 11 04 Natty Narwhal 10 10 and 10 04
How to Install GVIM a powerful text editor in Ubuntu 11 04 Natty Narwhal 10 10 and 10 04
GVIM is the graphical "implementation" of the command-line text editor (an IDE actually) called the Vim. Although may not certainly be as "connected" as with the GNU EMacs, but Vim text editor also has a quite long history with GNU/Linux thus it comes pre-installed by default in almost all the GNU/Linux distributions.
But for the obvious reason of not having a GUI, Vim (which is also based on another editor called "Vi") is not that popular among the typical GNU/Linux users but other advanced boys and gals such as system administrators still use it quite often since it allows us to edit any text (+ editing programming language code files) file without having to log-into a graphical user interface to this day nonetheless.
In short, it a GUI written using the GTK+ tool-kit (aimed at Gnome desktop, but you can use it in any desktop you want), but since it uses the Vim as the "engine", youll be getting almost all of its features in a very user-friendly graphical environment!.
Main features...

*. Change font (size, bold, italic, etc).
*. Find and replace.

*. Undo/Redo.
*. Automatic spell checking.
*. Open multiple windows by splitting the window by horizontal or vertically.
*. A "file explorer" of its own which lets you locate and load files to the window for editing.
 |
| The "command-line" type, file explorer to the left... |
*. Text wrap.
*. Send to print... are among the features that interests the standard users.
As mentioned, Vim is actually a programmer friendly text editor, thus GVIM also lets you do other things like Syntax editing, set compilers, "Make" files (compiling), etc which are again, not that useful for the usual users.
You can install GVIM in Ubuntu 11.04 Natty Narwhal, 10.10 and 10.04 by using the below command in your Terminal window.
sudo apt-get install vim-gtk
But, just like with GNU/Emacs, this is not for everyone. For instance, if you enter its settings window, then almost all the settings are activated using commands! rather than graphical tools.
But still, if you usually deal with a lot of Syntax editing or HTML/XML editing... then GVIM is a fast and feature-rich front-end to the original Vim "engine" nonetheless.
But as a final verdict, in my humble opinion, if youre looking for something to replace the Gedit type text editor for instance, then you should have a look at something like the Leafpad or Mousepad or even the awesome FocusWriter will certainly suite rather than the GVIM.
Available link for download
Sunday, April 16, 2017
How to Install Sysinfo in Ubuntu 11 04 Natty Narwhal 10 10 and 10 04
How to Install Sysinfo in Ubuntu 11 04 Natty Narwhal 10 10 and 10 04
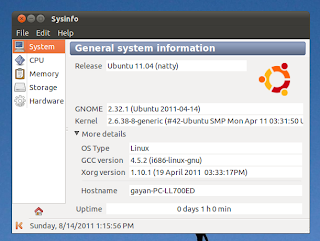
Although Ive already talked about a PC hardware information "gatherer" for GNU/Linux called Hardinfo which is pretty darn good btw. But for one main reason I quite liked another one called Sysinfo because of its simplicity and well designed "categorized data structure" (didnt know how else to put it :D).
The main GUI of Sysinfo is very minimalistic yet the application itself looks very professional. It has a nice Welcome screen (animated, well, who cares!, but that "approach" a bit rare in GNU/Linux apps, dont ya think? ;-) ) and all the hardware of your PC/Laptop are categorized quite nicely to the left side of the screen too.
Main features...

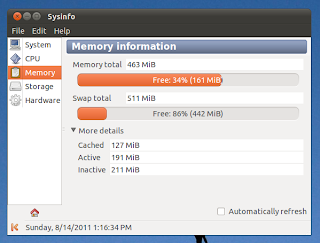
*. Has five (5) basic categories - System, CPU, Memory, Storage and Hardware.
*. Shows a huge list of information related to both your Hardware and software such as the desktop version and its kind (Gnome, KDE, Xfce and LXDE, etc).
*. Memory Usage and Swap space, Cached memory, etc.
*. Under storage youll find all the storage details such as HDD, CD/DVD drives, USB or SCSI drive BIOS versions, vendor, capacities, etc.
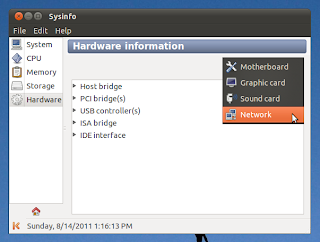
*. If you want more information, then just click on the "Hardware" tab and you can either choose from the drop down menu (as shown in the below screenshot) to filter out certain hardware, etc with ease as well.
You can install Sysinfo in Ubuntu 11.04 Natty Narwhal, 10.10 and 10.04 by using the below command in your Terminal window.
sudo apt-get install sysinfo
After the installation you can run it from: "Applications" -> "System Tools" - "Sysinfo" or just press "Alt" + "F2" keys and enter the below command into the box and press enter.
sysinfoThats it. Hope this was helpful.
Available link for download
Sunday, March 26, 2017
How to Install ClipGrab in Ubuntu 11 04 Natty Narwhal 10 10 and 10 04
How to Install ClipGrab in Ubuntu 11 04 Natty Narwhal 10 10 and 10 04
Although you can download YouTube videos while using a web browser and installing an addon for whatever the one that youre using with ease, but if you usually deal a lot with YouTube and their clip downloads, then wouldnt it be nice to have a dedicated application for that exact purpose?.
If your answer is "Yes", then you should check out ClipGrab. Its written in Qt-toolkit, looks awesome and importantly, lets you search and grab any YouTube videos (and many other similar online video sharing sites!) you want with ease.
Main features...
*. Search for video clips with thumbnail previews.
*. Change save location.

*. Choose the video container format: Original, MPEG4, OGG, WMV (Yikes!), MP3 and Ogg Theora (the official Ogg audio derivative for the video formats).

*. Add audio meta-tags automatically (album, artist, etc).
*. Change between video resolutions (1080p, 720p, 480p, medium or low, etc).
*. Clipboard support: meaning that, whenever you copy or play a YouTube video in your web browser for instance, ClipGrab will be able to automatically fetch that clip and let you download it easily at later.
*. It also supports Vimeo, Dailymotion, MySpass, Clipfish and mare other online video sharing sites.
*. Use proxy servers (you naughty geek! :P).
*. Enable/Disable run in the system tray area.
 |
| Settings window... |
sudo add-apt-repository ppa:clipgrab-team/ppaIf it does not show in your menus... then simply press "Alt" + "F2" keys and enter the below command into the Run box and press "Enter".
sudo apt-get update
sudo apt-get install clipgrab
clipgrab
Available link for download
Friday, March 24, 2017
How to Install GtkHash Checksum Generator in Ubuntu
How to Install GtkHash Checksum Generator in Ubuntu
Checksum, as the name denotes, is a method thats developed to let users to check or compare, lets say a file that youre holding called "B" (assuming that its a copy of an original file called "A") is corrupted or not while copying or moving. Its something a bit similar to the idea of a finger print, somewhat.
How the heck can that happen?
To be honest guys, Im not an expert on that subject. But to share my experience with you, there are (very few actually) occasions that after downloading a ISO (say an operating system) and then after burning it to a CD/DVD but while trying to boot into the OS, the CD/DVD rom says "corrupted disk" or something similar ("bugger!" errrr).
To make things worse, while burning CD/DVD in this case, the application wasnt able to detect any "corruptions" and as result now I have an entire CD/DVD wasted!. But if I used a checksum calculator before burning it into a CD or DVD then the app most probably be able to detect the "corruption".
 |
| GtkHash main window... |
The reason I said "maybe" was because, sometimes these corruptions occur in a very very subtle ways thus it may not even be visible which only gives errors while trying to use it. But there are occasions however not only Checksum apps can let you identify corrupted files but they can even recover some of the damaged data too!.
Although not just while downloading these corruptions can occur while youre simply copying a file in between your local HDD or USB, etc.
I think the reason for such behavior is due to the fact that when copying or downloading, etc the OS first sends the data to the cached location on RAM and then to the HDD... thus in the process some of the data can be corrupted due to small voltage fluctuations on RAM, due to data collisions, or common data losses while downloading etc (scary stuff huh ;-) ). Whatever the reasons are, they can happen.

In thas sense, GtkHash is actually does not let you check for the integrity but its a handy application that lets you calculate or create a Checksum for any given file and save it, thus say the data on that file is very very sensitive (perhaps it contains passwords or bank account numbers, etc).
Then after you moved/copied the file into a disk or any location that you want then you can later use a Checksum (also known as integrity check) checker to make sure whether its corrupted or not.
Because for a password or especially for archives and encrypted data, even the most subtlest "data corruption" can make it un-usable!. CD/DVD burning applications usually come with a built in ability to check the integrity via Checksums generated by apps such as GtkHash.
 |
| It supports creating Checksums using various algorithms... |
In that sense, GtkHash is a GTK written (obviously :D) Checksum generator that you can use to create a Checksum file for any given file under GNU/Linux using various algorithms.
You can install GtkHash in Ubuntu 11.04 Natty Narwhal, 10.10 and 10.04 by using the below command in the Command-line window.
sudo apt-get install gtkhash
 |
| It has a separate "list view" that lets managing multiple files with ease ... |
Available link for download
Friday, March 17, 2017
How to Install Amarok 2 4 3 Berlin in Ubuntu Kubuntu 11 04 Natty Narwhal and 11 10
How to Install Amarok 2 4 3 Berlin in Ubuntu Kubuntu 11 04 Natty Narwhal and 11 10
Amarok is one of the most famous applications/portions of the Qt toolkit written KDE desktop. As promised by the developers with the recently released 2.4.2 beta1 version... it did undergo some GUI and few other major changes which was their preparation for the upcoming 2.4.3 release.
And now the developers have officially announced the availability of the Amarok 2.4.3 "Berlin"!. With this release theyve decided to remove the lower "status-bar" and from now on notifications will be using that "space" which could be cool (or maybe not).
Main features...
*. Few more dynamic playlist related enhancements that were triggered in the 2.4.2 beta version such as Quiz-play bias and a new podcast integration with the Gpodder aggregator, etc.
*. Now you can use drag-n-drop to copy/move your local music collections (including inside the playlists) which was again introduced with the recent beta version but it seems that the playlist in general has been "cleaned" here and there so much more easy to understand (in their own words).
 |
| This is actually a true screenshot of 2.4.3 (too from the official site) but its a damn shame that theyve used MS Windows 7 for the screenshot rather than using GNU/Linux. So I cropped out the borders *put the angry dude here*. Man this attitude of KDE just pisses me off sometimes!... |
*. Thanks to a bug-fix now Amarok geeks :) can configure individual podcast episode names.
*. Automatic scrolling in Lyrics applet.
*. The ability to scrobble the composer as artist to Last.fm + a lot of bug fixes (such as CD ripping related, last.fm, dynamic playlists, etc) as usual.
We can install Amarok 2.4.3 "Berlin" in Ubuntu 11.04 Natty Narwhal by using the Kubuntu teams back-ports PPA, but heres the thing.
The team havent come up with the 2.4.3 version since its so new and only released it like few hours ago. But perhaps when you read this it maybe available. If it is available then you can install it by using the below commands.
Update: Thanks to "jepong" (see below comments) theres actually a PPA that exists created by Philip Johnson and using the we can finally install this "thing" ;-). I have replaced the original commands with this new PPA but if you want to try the official Kubuntu back-ports (they still havent come up with it yet) then just replace the text in "Green" with the below one.
kubuntu-ppa/backports
For Ubuntu 11.04 Natty Narwhal users...
sudo add-apt-repository ppa:philip5/kubuntu-backports
sudo apt-get update
sudo apt-get install amarok
For Kubuntu 11.04 users use the below command instead.
sudo add-apt-repository ppa:philip5/kubuntu-backports
sudo apt-get update
sudo apt-get upgrade
But luckily for the Ubuntu (Kubuntu included) 11.10 Oneiric Ocelot users it seems that Amarok 2.4.3 is already in the repositories!, for the obvious reason of were like few hours away from the official Ubuntu 11.10 Alpha 3 release. So itll be included in the Alpha 3 ISO image it seems.
Anyhow, if you dont daily update the existing 11.10 Alpha version then you should be able to manually install the latest version by using the below command.
sudo apt-get install amarokAs for the 11.04 users, a little patience goes a long way. I know its hard but but... :).
Available link for download
Thursday, March 16, 2017
How to Install GPicView in Ubuntu 11 04 Natty Narwhal 10 10 and 10 04
How to Install GPicView in Ubuntu 11 04 Natty Narwhal 10 10 and 10 04
GPicView in the default image viewer for the lightweight LXDE desktop. Remember, this is certainly not a replacement for other advanced photo management apps such as Shotwell, Picasa, etc in fact as mentioned before, GPicView is just a simple image viewer rather than a "manager" at all.
It has a highly simplified GUI (a lot closer to the one that used to come with MS Windows XP) and loads fast as a result. Other than viewing images it can let you do things like...
*. View in full screen.
*. Rotate clockwise and counter clockwise.

*. Flip horizontally/vertically.
*. Save in a different formats.
*. Delete images from the window... and a separate "preferences" window that lets you configure few things such as - changing the background color of the app itself and few conformation dialogs, etc.

And on the negative side it cannot let you crop or change color settings as with Geeqie, F-Spot or gthumb for instance either. Anyhow...
You can install GPicView in Ubuntu 11.04 Natty Narwhal, 10.10 and 10.04 easily since its in the official Ubuntu software repositories by using the below command.
sudo apt-get install gpicview
Enjoy! (man, I gotta replace this "usual ending word", any suggestions ?? ;-) ).
Available link for download
Saturday, March 11, 2017
How to install Fluxbox Window Manager in Ubuntu
How to install Fluxbox Window Manager in Ubuntu
Fluxbox is a super fast window manager written in C++ that is being used as the GUI "creator" by many desktop environments. And just like with OpenBox (another WM) which is used in LXDE, Fluxbox is also extremely resource friendly thus its especially being used in those "small GNU/Linux distributions" (you know small in size and resources, etc) nowadays more than ever as well.
Although the last time I tried it (bit of a long time ago actually), well it was really stable and fast but it did feel somewhat "sluggish" when it comes to minimizing or maximizing windows (with few delays just as with Openbox).
But if you want to give a try at this resource friendly window manager in Ubuntu, then the installation is pretty simple actually since its in the official repositories. You can install Fluxbox in Ubuntu 11.04, 11.10, 10.10 and 10.04 by using the below command.
sudo apt-get install fluxboxBut as a Ubuntu 11.04 Natty Narwhal user, if you want to use the latest builds of Fluxbox window manager, then you can certainly make some use out of the dedicated PPA channel (thanks to Paul).
But remember, it includes the "Nightly Builds", so the packages may not be the most stable ones out there thus should only be used for testing purposes or if you want to get the latest updates of Fluxbox (and other related packages) but okay with the fact that it might drift you towards a bit of an unstable system (yikes).
To add it to Natty and install the latest builds you can use the below commands. As usual, open your terminal and enter the below commands.
sudo add-apt-repository ppa:fluxbox-maintainers/nightlyThen log-out and on the GDM log-in screen, just choose "fluxbox" under session. That should do the trick. But remember, this fluxbox WM only supports Gnome and KDE desktops + it will not support Unity or Gnome Shell interfaces since theyre build using entirely different, a bit advanced compositing WM such as Compiz and Mutter.
sudo apt-get update
sudo apt-get install fluxbox
But dont hope to get the same level of features with fluxbox as with Gnome or KDE for instance because at the end youll be disappointed!.
And while using the "Fluxbox" desktop session, if you launch apps such as Nautilus file manager, then youd run into trouble because Nautilus will try to replace the desktop management instead of fluxbox!.
But as a quick solution, we can disable Nautilus for dealing with your desktop. To do that, open the terminal window and enter the below command.
gconf-editor
Then from the window that you get, go to: "apps" -> "nautilus" -> "preferences".
Now to your right-side scroll down until you see a setting called "show desktop" (as with below screenshot). Remove the check mark and it should solve your problem.
 |
| This will also disable desktop icons, etc in Gnome classic and Unity too. So, unless youre gonna be using Fluxbox as your primary somewhat desktop... then this could be a headache :)... |
Available link for download
Thursday, March 9, 2017
How to Install ATI AMD Catalyst 11 7 Linux Driver in Ubuntu 11 04 Natty Narwhal
How to Install ATI AMD Catalyst 11 7 Linux Driver in Ubuntu 11 04 Natty Narwhal
For both ATI and Nvidia GPU devices in GNU/Linux you should have installed the proprietary drivers if you want to get the full throttle out of your awesome VGA card :D. For instance, with the recent netbooks related AMD Fusion chip-sets where we have both a CPU and the GPU at the same "core" (same physical chip), if you havent installed the proprietary driver then the GPU will not be able to play HD videos nor 3D games and rendering in general in full throttle :/.
So although the idea of "proprietary" is not compatible with the GNU license but thats how the world is anyway, you can either chose to swim with it or against.. (what the heck am I talking, sorry about that).
Anyhow, few days ago ATI (now owned by AMD) released the latest version of their Catalyst driver for GNU/Linux: the 11.7!.
Unlike with many other releases the 11.7 version does bring few major features or changes in general such as...
 |
| Im not supposed to be doing this but but... :) |
*. VLC player 1.1.9 related hardware acceleration bug fixed.
*. PowerXpress support for GNU/Linux (finally) - This technology makes it easy to switch between discrete graphics and dedicated graphics (say when you use your Netbook on AC power) which delivers better performs or low performance and enhanced battery life.
*. Few Catalyst control center related bug fixes.
*. De-noise and few other video playback related performance related bug fixes... are just a few to mention.
You can install the ATI/AMD Catalyst 11.7 driver in Ubuntu 11.04 Natty Narwhal by using the below procedure (for 10.10 and 10.04 users please read from the official AMD Wiki pages, here and here).
*. If have you installed any previous proprietary drivers such as the 11.6 series for instance, then you must remove them before proceeding!.
Now Im not going to do a lot of "explaining" because I feel like Id easily make some of you guys confused.. So basically just enter the below command in your Terminal window (Again remember, these steps are only for those of you who have installed an older version of Catalyst drivers).
sudo sh /usr/share/ati/fglrx-uninstall.sh
If you get an error saying that such command does not exists, etc then use the below one instead.
sudo apt-get remove --purge fglrx fglrx_* fglrx-amdcccle* fglrx-dev* xorg-driver-fglrx
Now lets begin the actual installation procedure.
1. Now first download the actual driver wizard (it contains both 32-bit and 64-bit versions integrated) and make it executable. For that enter the below commands.
cd ~/; mkdir catalyst11.7; cd catalyst11.7/
wget http://www2.ati.com/drivers/linux/ati-driver-installer-11-7-x86.x86_64.run
chmod +x ati-driver-installer-11-7-x86.x86_64.run
2. Now use the below commands to install it.
sudo -s
./ati-driver-installer-11-7-x86.x86_64.run
Just follow your on-screen instructions (the installer is pretty much automatic) and within few minutes you should have installed the AMD/ATI Catalyst 11.7 in Ubuntu 11.04 Natty Narwhal.
3. Optional Step -
Most people might not need this, but if you found that the graphics are actually worse looking or the ATI driver is not loaded into the Ubuntu then you might want to update a configuration file called "xorg.conf". As said youd probably wont need to do this, but if you need then open enter the below command in your Terminal.
sudo aticonfig --initial -f
Thats it. Now youre done!.
Below method is not necessary by any mens and its only for those of you who wants to manually build ".deb" packages only.
Need a pre-build ".deb" file?
You can create a ".deb" file if you want. It can be quite handy if you want re-install the driver after a fresh install of Ubuntu where you dont have to re-download some of the required packages to build the driver and install. So...
If youd like you can make that ".deb" package of the installer first and then install it too. To do that skip the step "2" and enter the below commands instead (and might want to use that step "3" command too).
First we gotta get the pre-requisite packages.
A. Get the pre-requisite packages - Although this may not be necessary for some since youd probably have them installed automatically installing other apps as dependencies but do it just in case. Open your Terminal window and enter the below command.
sudo apt-get install build-essential cdbs fakeroot dh-make debhelper debconf libstdc++6 dkms libqtgui4 wget execstack libelfg0 dh-modaliasesB. If you use the 64-bit Ubuntu Linux version then make sure to install the below packages too (only for the 64-bit geeks).
sudo apt-get install ia32-libs
C. Now lets build the ".deb" file. For that use the below command.
sudo sh ./ati-driver-installer-11-7-x86.x86_64.run --buildpkg Ubuntu/natty
D. Now install it by using the below command.
sudo dpkg -i fglrx*.deb
Yep thats it. Im sorry that the article looks a bit longer. Enjoy!.
Available link for download
Monday, March 6, 2017
How to Install Flickr Remote Organizer Frogr in Ubuntu
How to Install Flickr Remote Organizer Frogr in Ubuntu
Flickr is a very popular, online photo sharing service thats now owned by Yahoo. Although the search engine giant Google also has their own version called Picasa which is as good as Flickr is but theyre both just give us the ideal opportunity to share and show-off our talents with ease nonetheless :).
If you use Gnome as your desktop and daily deal with Flickr then wouldnt it be nice if you could find an app that integrates directly into your Gnome desktop and lets you upload pictures to Flickr with ease?... in that case, Frogr which stands for "Flickr Remote Organizer" is a great little tool that can make things much more simpler for you :).
Main features...
*. Written in GTK+ toolkit (in fact the latest 0.6 version now supports the GTK3 tool-kit which Gnome 3 is written) thus integrates seamlessly with Gnome but you can use it in other desktops such as KDE or in other desktops as well.

*. The ability to log-in directly to Flickr using their API and upload pictures directly from the GUI (well it should!, thats the idea, right? :D).
*. Change visibility of your uploaded pictures (whether they are accessible to everyone of just "private").
*. Built it content type:
For instance, I usually upload screenshots of applications. So, since Frogr has a built in "tag" called "Screenshots" (+ "Photo" and "Other"), all I gotta do is just choose "screenshoots" and all my pictures will be categorized as "Screenshot".
*. Safety level settings (safe, moderate and restricted).
*. Build in photo releasing licenses to add with your pictures.
*. Drag and Drop support.
*. Support accessing via Proxy servers.
*. Open images via external image viewers.
*. Edit Photo name and add descriptions (you know the usual photo tag editing).

*. Multiple Flickr account support... are among Frogrs main features to mention.
You can install Flickr Remote Organizer (or Frogr) in Ubuntu 11.04 Natty Narwhal, 11.10, 10.10 or even 10.04 by first adding its official PPA. To do that, as usual use the below commands in your Terminal window.
sudo add-apt-repository ppa:mariospr/frogr
sudo apt-get update
sudo apt-get install frogr
Thats it.
Available link for download
Wednesday, March 1, 2017
How to Install LightDM in Ubuntu 11 04 Natty Narwhal
How to Install LightDM in Ubuntu 11 04 Natty Narwhal
Canonical said that if they get rid of GDM (gnome display manager) and install something a bit "light-weight" would certainly help to speed up the booting times in Ubuntu Linux. First I thought "ya, like its gonna make a difference" but it turns out to be that I was quite wrong (damn it!).
Starting with the Ubuntu 11.10 alpha releases, Canonical did replace GDM with another lightweight log-in manager called LightDM and according to some testers, LgihtDM has actually being able to cut out few seconds of booting times in Ubuntu thus significantly speeding things up!. Although LightDM is certainly not the only reason for this sudden "boost" but it has certainly helped, it seems.
So I thought giving it a go in my Ubuntu 11.04 Natty Narwhal Laptop and how did it went?, well, not so good.
But to remind you that both lightDM and Ubuntu "integration" is at the beta stage at this moment thus bugs and compatible issues will have to be tolerated and even if you successfully installed LightDM in Ubuntu 11.04 Natty Narwhal there are no guaranteed results.
 |
| The "beauty" lightdm!... |
So if at this moment you should not try to install this if you want the best possible stability out of your current Ubuntu OS. Anyhow, I dunno whether its for the good or the worse :P but before installing and replacing GDM with LightDM and later realizing that it doesnt work at all thus all of a sudden you have an Ubuntu OS thats stuck at the log-in screen... there is actually a way that we can "test" LightDM, like running it in a Virtual environment before actually replacing the GDM.
So lets begin the installation.
There is a PPA available for this, so the installation is pretty straight forward. Just open your Terminal and enter the below commands.
sudo apt-add-repository ppa:lightdm-team/ppaNow to the near end of the installation youll be asked by a window that says to choose either "gdm" (the current one) or the "lightdm". Dont choose lightdm, yet. Make sure youve selected "gdm" (just for now :D) and press enter.
sudo apt-get update
sudo apt-get install lightdm lightdm-greeter-example-gtk
 |
| Just make sure youve chosen "gdm", just for now :)... |
How to test it?
I actually grab most of these information from this Ubuntu Wiki page (it kinda destroyed my perception of being an "expert" didnt it?, shi*) and it says that to test lightdm before applying it, to use the below command.
lightdm --test-modeBut my 11.04 Natty gave me an error saying that an Xserver module called "Xephyr" is missing. So before "testing" it in the somewhat "virtual" mode, you too might want to install that "Xephyr". To do that, open your Terminal and enter the below commands.
sudo apt-get install xserver-xephyr
Now enter the above command and it should open up a new window and will run lightdm in it. Although you can click on the options such as users, etc on the window (as you were running it for real) but its just a "virtual" environment thus you cant log-in or do anything at all.
But the thing is that, if you see a perfectly running lightdm (with a GTK theme, working menus, without any screen flickers, you know nothing "unusual") then youre good to go.
Even if you dont see a GTK theme but an ugly looking theme, still lightdm will run just fine. But after you put this command if nothing happened or even if it did open a new window and then gave few blinks and just crashed (like in my case, thats why I dont have a screen shot of that window), then thats whats going to happen if we actually replace it with GDM.
Update: According to Craigs comment below, he actually have found out that after installing a GTK-Greeter theme by using the below command should solve this "flickering and crashing" issue.
Although I havent tested it (I removed lightdm ... gonna wait till 11.10 hits the streets) but its worth trying.
sudo apt-get install lightdm-gtk-greeterSo if you see any on those, then please go no further and wait a little longer until they introduce a stable version. But they also update this PPA quite often so youd probably have a much improved version by the time you read this post, hopefully.
But after running it in the "test-mode" if it ran perfectly well for you, then you can safely enable it for real by entering the below command in your terminal window and choosing "lightdm" this time instead of "gdm". Otherwise, as said, its at its beta stage right now, thus we should better wait (not by choice, in my case :/).
sudo dpkg-reconfigure gdmIf however this works really well in your computer (lucky Geek!) then you can install several themes for Lightdm that uses GTK, Webkit or Qt as the "engine" to make thing look much more beautiful as well :D. To install them use the below commands.
sudo apt-get install lightdm-engine-webkit
sudo apt-get install lightdm-engine-gtk
sudo apt-get install lightdm-greeter-example-qt
Good luck!.
Available link for download
Monday, February 20, 2017
How to Edit the Contents of an ISO Disk Image in Ubuntu
How to Edit the Contents of an ISO Disk Image in Ubuntu
As many knows already, you dont need any other application other than an archive manager if all you want is to view the contents (+ even changing the contents) of an ISO disk image file. But if you want more than that, such as mounting the content or changing it without loosing the boot-able core files (if any) then you will have to use a dedicate tool nonetheless.
And when concerning the contents of an ISO file that holds an operating system for instance then yes, you can still use an archive manager to add/delete files from it ... but if you do so, them most of the time after doing your changes, youll have an un-bootable ISO disk image.
The reason is simple. An archive manager is simply an archive manager thus (most of the time) it wont be able to edit the content without destroying the "Boot Record" portion that includes all the information needed for making it boot-able.
In that case, if you happened to use Ubuntu ;-), then theres an excellent Utility called "ISO Master" that lets you do exactly that.
 |
| Welcome to the master of the "ISO", kiyahooooooooooooo! ;) |
*. Add/Edit/Rename and delete the contents of an ISO file.
*. Only supports the ISO disk image extension (although you can read other extensions such as NRG and MDF, more later).

*. Has the ability to view certain types of files such as HTML and Text related ones.
*. Extract the contents (since a disk image is a sort of an archive).
*. Save/Delete or manually change the Boot-record according to your own preferences... are its main features.

You can install IsoMaster in Ubuntu 11.04 Natty Narwhal, 11.10, 10.10 and 10.04 by using the below command in your Terminal window.
sudo apt-get install isomasterRemember if you want to view some of the contents of the disk image file, say a configuration file or a Text file for instance. Then if you use a desktop other than Xfce, then make sure to go to its "Options" window and change the "viewer" command to "gedit" if you use Gnome classic desktop or with whatever your preferred editors name.
 |
| By default it uses the Editor "mousepad" (Xfces text editor). But I replaced with my own... |
Another thing, ISO Master also supports reading ISO, NRG and MDF files as well. But it can only save files the .iso format only.
Anyhow, if you want to create a bootable ISO disk image (CD/DVD, etc) file using files in your HDD from scratch or modify the content of an existing disk image (without destroying its core-properties such as above mentioned boot-entries) then ISO Master is certainly one of the best without a doubt. Its also free and even supports MS Windows too (Windows version is not free though :/).
Available link for download
Sunday, February 19, 2017
How to Install Faenza 1 0 Icon Theme in Ubuntu
How to Install Faenza 1 0 Icon Theme in Ubuntu
Faenza icon theme has got such a popularity that if you havent heard about it by now, then thats considered as something weird :) (just kidding). But seriously, if youre looking for one of the best icon themes that works under Gnome, Xfce and KDE (also works with Ubuntu Unity too), then Im pretty sure that there arent that many that can outperform Faenza for both beauty and features.
Unlike with many other icon themes, this one comes with a complete, fully "colorized" usual icons + a full darker version (Monochrome), tool-bar icons, especial icons for mounted devices, etc. Few days ago the developer has updated Faenza to its official 1.0 version!.
This may not bring huge list of new stuff, but to mention few things such as...
*. A lot of icons added for Gnome Shell.
*. Enhanced icon support for the Xfce desktop.
*. Fedora auto-plus and release notes, SEtroubleshoot, etc new application icons.
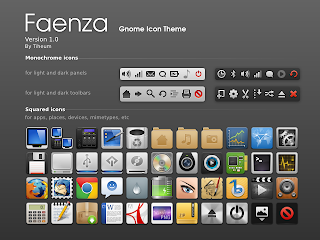
*. All applications in 16x16.
*. Added a new status icon for: "nm-device-wired-secure" notification... are the "whats new" in this release.
You can easily install Faenza 1.0 icon theme in Ubuntu 11.04 Natty Narwhal, 11.10, 10.10 and even in 10.04 by using the official PPA channel. As usual, open your Terminal window and enter the below commands.
sudo add-apt-repository ppa:tiheum/equinoxThat should do it. OR if you use any other distribution, say Fedora 16 for instance, then you can just download the icon archive from here and then extract the content. Change your directly through command-line to the extracted directory and enter the below command.
sudo apt-get update
sudo apt-get install faenza-icon-theme
./INSTALLThis should open-up a window asking you to choose a distribution using their respective logos. Choose your Distro and the Gnome menu icon and hit enter. Later if you wanted to un-install it, then again come to that extracted folder and issue the below command.
./UNISTALL
All the proper information can be found in this Gnome Look page, from the developer himself. Good luck.
Available link for download
Sunday, February 12, 2017
How to Install Gnome Paint in Ubuntu
How to Install Gnome Paint in Ubuntu
Gnome-Paint is a simple and very basic painting application designed for the Gnome desktop which you can also use in Ubuntu Linux as well (obviously). But remember, this is not an advanced tool and some "must have" type features such as Text tool and the Zoom in-out tools are not completed yet thus you cant use them!.
But if youre looking for an application that you can use to draw "stuff" to kill some time :) and okay with not having the ability to add text (although you can use the pencil tool though) or Zoom them, then Gnome-Paint is a decent application. But as said before, please remember, this is not a professional painting application by any means.
Main features...
*. Since its designed by Gnome geeks :D, it has a simple yet easy to use GUI (designed using the GTK+ toolkit).

*. To your left youll see a list of tools such as: Crop, color picker, eraser and few types of selection tools. But you cannot use Text and the zoom tools, yet.
*. Undo/Redo.
*. Flip, rotate and load various types of images.
*. Invert colors.
*. Save in different formats... are the main features.
You can install Gnome-Paint in Ubuntu 11.04 Natty Narwhal, 10.10 and 10.04 by using the below command in your Terminal window.
sudo apt-get install gnome-paintAgain remember, this is still under development and the overall application responsiveness was not bad but I did encounter few slowish type issues. For instance, after using a tool (say the eraser), it took a small (very small but noticeable) delay to "update" it on the image.
 |
| Not "everything" is fully implemented yet... |
Available link for download
Saturday, February 11, 2017
How to Install Xarchiver archive manager in Ubuntu Linux
How to Install Xarchiver archive manager in Ubuntu Linux
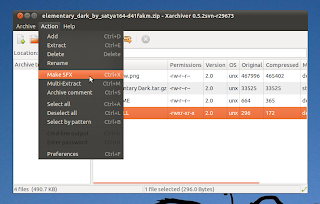
By default Ubuntu uses the File-Roller as the main archive manager (an original Gnome application). Its quite good actually but being a Gnome app, for the good or the worse it integrates the Gnomes simplicity (yikes) thus it wont let you change some options such as the default temporary folder location and creating a self extracting archive for instance.
Anyhow, if youre a bit frustrated with it and looking for something else that has the capacity to act as a powerful and fast loading archive management utility, then you should try the one called Xarchiver.
Xarchiver is basically a GUI front-end that uses a lot of built in command-line tools which are built into the GNU/Linux operating system to handle archives + is already the default archive management tool used by LXDE and Xfce desktops too.
It has a pretty simple (bit similar to the File-roller actually) interface and lets you do things like...

*. Add/Rename/Delete or Create an archive (containing emails, text files, etc) from scratch.
*. Save an archive into a different format.
*. Add or remove passwords.
*. Test for extraction errors.
*. Supports a huge list of file formats such as - 7z, ARJ, bzip2, gzip, LHA, lzma, lzop, RAR, RPM, DEB, tar, and ZIP.
*. As said it also has the ability to let you create self extracting compressed files which is very handy since you can decompress those files without having to have installed an archive manager.
*. Add a comment (another features that File-roller doesnt have).
*. Show the command-line out put (handy while trying to figure out if you had an issue while extracting).
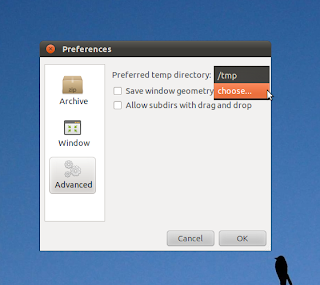
*. A separate "preferences" window (above screen-shot) that lets you configure things such as - ask for conformation while deleting files, change temporary folder location (very useful if you had a "data-full partition" thus the archive manager most probably be unable to extract the content otherwise), show/hide archive commenting, etc.
You can install the Xarchiver in Ubuntu 11.04 Natty Narwhal, 10.10 and 10.04 by entering the below command in your Terminal window.
sudo apt-get install xarchiver
That should do the trick. Enjoy your new and powerful Xarchiver for creating e-mail archives, out of multimedia files or password protected self extracting ones which makes exchanging archives much more easy and secure + for many more of your other nerdy needs :).
Available link for download
Monday, February 6, 2017
How to Create a USB Bootable ISO image in Ubuntu
How to Create a USB Bootable ISO image in Ubuntu
Although the optical disk aint gonna be dead anytime sooner ;-) yet because of the popularity of netbooks or Tablet PC type electronic gadgets and when it comes to installing Ubuntu operating system in on them, USB devices (such as pen drives for instance) is the least expensive and sometimes the only way to perform the installation.
Even if you have an Optical drive, still trying a GNU/Linux liveCD on a USB drive is the best option in my opinion when compared with a original method of burning it into a CD/DVD because there are few advantages.
1. Theyre noiseless!:
Well, if you want the experience the best performance while trying the LiveCD and if youre burning a CD/DVD, then you should go for the maximum amount of Burning speed so the LiveCD/DVD will be able to perform tasks in a much speedier way.
But thatll also make it a bit noisy, dont you think?. But a USB drive is noiseless!.
2. Faster than CD/DVDs (most of the time):
Unless you have a bit older USB stick/pen-drive, most never pen drives have really higher MB output thus youll be experiencing a much more faster LiveCD "experience" in comparison with the CD/DVD method. Although not at its best, this will also help you to get a better idea of the actual (close) performance of the OS it self.
But as said, this might not always be the case since SATA or SSD drives are a hell lot faster than most of the USB drives nonetheless :).
Anyhow, in that sense, if you have already installed Ubuntu in your Netbook for instance, but wondering how to create/burn the recently downloaded never version of the Ubuntu ISO image into your USB disk... did you know that Ubuntu comes pre-installed an application called "Usb-Creator" (which is basically a GTK front-end that uses the "usb-creator" command-line tool) that lets us does exactly that!.
Main features...

*. As said, its a default app thus if youre running a never version of Ubuntu, this you dont have to manually install it (comes pre-installed in Ubuntu 8.10 and above).
*. Lets you burn Ubuntu ISO images to any USB media. Although Im not sure but you might also be able to use a different GNU/Linux (other than Ubuntu) with it too... but not sure though.
*. Save your documents: Unlike with a LiveCD, with a USB disk, by using this tools we can manually assign how much of MB to be reserved for saving our documents that we create while using the Live Ubuntu OS which we can retract at a later time. Again this is impossible with a LiveCD.
Requirements...
*. You must have an Ubuntu version 8.10 or above.
*. At last 1GB of free space.
*. The image has to the Ubuntu desktop edition (which is the most commonly downloaded one anyhow).
As said, to launch this, you first need a Computer thats already have Ubuntu installed.
Then log-into your desktop and put an insert an empty USB disk to your computer. Then press "Alt" + "F2" keys and put the below command and press the enter key.
usb-creator-gtk
1. Now, this should open up a window similar to the below one. From the GUI, under "Source disk image...", open your ISO image by navigating to the location OR if you have an Optical drive with a LiveCD already loaded, this itll display it too and let you burn the content of that LiveCD directly to the USB disk as well.
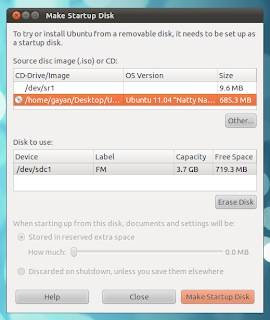
3. As with my screenshot, if you found that the options to manually enter documents space is disabled, thats because (in my case) I dont have at least 1GB of space left.
4. So in that case, backup all your data and then simply press the "Erase DISK" button to remove all your data on the USB disk (warning: this will remove all of the current data on the USB drive!).
And then you should be able manually assign the space for your documents data OR completely disable that function by clicking on the "Discarded on shutdown, unless you save them elsewhere" check mark.
5. After making all the changes, just press "Make Startup Disk" button and the Usb-Creator should automatically "burn" the Ubuntu ISO desktop image to your USB disk!.
Well, thats about it. Before booting using the USB disk, make sure youve setup the BIOS to use USB as the default boot-device location (I know you knew that but just in case :D). Good luck.
Available link for download
Friday, January 27, 2017
How to Install Leafpad Text Editor in Ubuntu 11 04 Natty Narwhal
How to Install Leafpad Text Editor in Ubuntu 11 04 Natty Narwhal
Both Unity and the Gnome classic desktop share the same text editor in Ubuntu Linux 11.04 (oh oh :P) which is called Gedit (the default text editor that comes with Gnome actually). It loads fast and has a lot of options (can even handle some HTML files) thus its a powerful text editor without a doubt.
But if youre looking for something thats much more simpler than that, that which uses less resources, then Leafpad is the one to call for :). Leafpad actually comes as a part of the LXDE desktop (a light weight desktop for GNU/Linux) and in comparison with Gedit or many others, it has very little options (no preference window at all), one of the fast loading ones + uses very little system resources as well.
Main Features...
*. Running more than one instance is supported (new windows), although tabs are not implemented there, yet which would have been nice otherwise.

*. Search and replace words/text.
*. Change font, word-wrap and display lines.
*. Cut/Copy/Delete and Undo/Redo ability.
*. Auto indent.
*. Open and save in few different file formats.
*. Print preview (and send to printing from its window).

*. Drag-n-drog support.
Thats about it. You cant change the background or any other look-n-feel of the text editor but for its purpose its quite good, I guess.
You can install leafpad text editor in Ubuntu 11.04 Natty Narwhal, 10.10 and 10.04 by using the below command in your Terminal window.
sudo apt-get install leafpadBut as said, remember, this cannot fully replace Gedit or Kate (Qt/KDEs text editor) for instance because of the lack of few minor options but that being said, if youre looking for something thats fast like hell and minimal distractions + low on resources, then Leafpad is something worth giving a shot :). Enjoy!.
Available link for download
Monday, January 23, 2017
How to Install DumpHD HD DVD Blu ray Decryptor in Ubuntu
How to Install DumpHD HD DVD Blu ray Decryptor in Ubuntu
Although as far as I know, HD-DVD format is no longer supported... nor any new movies are released using that technology and slowly the rival of HD-DVD, known as Blu-Ray, has replaced the market and is adopted as the new "standard".
But the point is, starting with DVD (which was introduced when I was really young :P) which is followed by HD-DVD and Blu-ray, the content of these disks come encrypted by default using a proprietary system called "AACS" in hope of a "digital rights management", they say..
The manufactures has their reasons, saying that the purpose is to reduce abuse of "digital thieves and their activities", but as with MS Windows Vista where a certain encryption algorithm was pre-installed by default (which was more worse than with HD-DVD/Blu-ray) but few days after their initial release, hackers found a way to decrypt the content nonetheless :).

As everyone knows, if you just copy and paste an encrypted Blu-ray (or any other data) other than it consuming GigaBytes of your HDD space, you wont be able to do anything with it whatsoever, because its encrypted. But interestingly, almost all of these encryptions seems to be a bit weaker than what our computers are capable of and as a result as said before, most of these "encryptions mechanisms" are decrypted as soon as theyre released!.
Anyhow, let me come back to the topic. If youre searching for a HD-DVD/Blu-ray data decryptor for Ubuntu or GNU/Linux in general, then DumpHD is one of the best out there without a doubt. Its written using Java thus as long as you have installed the Java virtual machine (not just in GNU/Linux but it any OS!) in your operating system, DumpHD will run on top of it. Thus its a cross-platform utility.
Main features...

*. Supports Dual-Core decryption over EVO and m2ts container formats.
*. Decrypts ever ARF protections.
*. Support for every pack type of an EVO (including in-place decryption of ADV_PCKs - slightly incomplete, excluding Sequence Key Sections).
*. Also supports the "old" HD-DVD apart from the obvious contender Blu-Ray.
*. Decrypt the whole disk or file by file (single files).
*. Console out-put.
*. Change out-put directory.
*. 4 Themes (who cares!).
*. A nice, simple GUI.
You can easily install the DumpHD decryptor in Ubuntu 11.04 Natty Narwhal, 10.10 (might also work in 10.04 or older versions as well) by simply issuing the below command.
sudo apt-get install dumphd
Once installed, simply press "Alt" + "F2" keys and enter the below command to launch it.
dumphd
For the playback, you can use any command media player such as Mplayer, Xine or VLC, etc.
So, decrypting DVD/HD-DVD or Blu-Ray content is illegal, right?
To be honest I dont have a single answer for that. But I think if you really own the media/disk (if you purchased it for yourself) and the reason for the decryption is for back-up the data (in case something happens to the disk, etc) then I think its pretty much legal, only as long as you dont "share it" with others!.
But that could also change according to the laws of your country. So I personally hold no responsibility over what you do with this app and let me just copy->paste the usual legal notice here :).
Legal Notice: Patent and copyright laws operate differently depending on which country you are in. Please obtain legal advice if you are unsure whether a particular patent or restriction applies to a media format you wish to use in your country.Thats it. (seriously!, dont break any laws :D). Oh btw, if you want additional information, Ubuntu has an excellent help page which explains almost everything. Enjoy.
Available link for download
Thursday, January 19, 2017
How to Change the Display Screens DPI PPI Settings in Ubuntu
How to Change the Display Screens DPI PPI Settings in Ubuntu
DPI or dots per inch also stands for the tern pixels per inch. As the names suggest, its measure of how close your monitors pixels are to one another. When comparing with the recent Windows 7 operating system thats optimized for 100 DPI display screens... GNU/Linux still uses the 95 DPI (is also the Windows Vistas default settings) and there might be occasions that this could come in handy.
Why this is important?
As said, not everyone gonna need it. But since most of the never Netbooks or display screens in general have very sharp DPI settings (because those pixels are fixed into a smaller screen size) thus things may look a little too small and if youve been used to seen big text and windows "thanks" to your previous old computer... then you can certainly try changing the DPI in Ubuntu (or any other OS in that instance) to try to make things look a bit bigger.
Accessing DPI settings in Ubuntu (or in Gnome classic desktop to be more accurate) is fairly simple. And Im pretty sure almost all the Ubuntu (or Gnome geeks) know this... but if youre a bit new to Ubuntu and wondering ... then this is how you do it.
1. Just right click on your desktop and choose "Change Desktop Background".
2. Then click on the "Fonts" tab and under the sub heading "Rendering" click the "Details" button which should open-up a window similar to the below one.

3. By default Ubuntu or the Gnome classic desktop is optimized for the 96 pixels per inch but you can lower or increase the value to make things look more smaller or bigger.
But remember. the best possible (meaning sharp and clear windows, buttons, etc) setting for your OS is the default DPI that it comes with. And if you go below or beyond this "default" value that its optimized for... then things may not look that sharp. But you can try lowering these values here and there ... you know experiment a little.
You can also use this window to optimized font rendering settings to enhance their readability as well.
 |
| Remember the "magic number" ;-)... |
Available link for download
Monday, December 5, 2016
How to Manage Mounted Unmounted File Systems Easily in Ubuntu
How to Manage Mounted Unmounted File Systems Easily in Ubuntu
I remember in the past how hard it was with GNU/Linux while trying to mount and un-mounting file systems (especially proprietary ones such as Fat32 and NTFS). The more experienced geeks ;-) like to use the command-line for that since all those disk mounting utilities are installed by default into the OS thus you dont have to manually install a GUI.
But, even if youre a bit "advanced" still by having a GUI tool that uses those command-line utilities makes the whole process a hell lot easier. Although these days GNU/Linux is so good that it just automatically mounts USB devices with ease but still if youre having some troubles with USB pendrive which arrogantly refuses to be mounted + needs to a little tweaking here and there (yikes!), then a utility like "MountManger" can come quite handy.
Main features...
*. As said, this uses the already built in command-line tools thus comes with a huge list of options/features.
 |
| A powerful "little" companion ;-)... |
*. Mount and Unmount.
*. Change mount points.
*. Change mounting privileges of the users.

*. Manually set the supported file systems checked through Fsck utility ("0" means no check and 1 means manual scan for errors).
*. Enable/Disable mounted devices link (shortcut) creation, execute binaries, etc.
*. Specify encryption algorithms.
*. Change Umask, read/write features and a lot other advanced options.

*. Change file name encodings.
*. Heck, it can even mount disk images too! (ISO, NRG, MDF, BIN, etc).

*. As mentioned before, includes a USB mounting wizard that lets you easily mount any troublesome USB devices... are just fraction of its features to mention.
You can install MountManager in Ubuntu 11.04 Natty Narwhal, 11.10, 10.10 and 10.04 by using the below command in your Terminal window.
sudo apt-get install mountmanager
But please be very careful while accessing some of the advanced file system related settings and if you dont know what youre doing (to be honest, I dont even understand half of the options in it! :/), then please dont change anything. Although it does let you restore easily to the original settings, but still, think twice before stepping into the "unknown" ;-).
But other than that, if you want to do things like enable/disable read-write permissions or change mount points or even mounting disk image files which are considered as "usual needs" for GNU/Linux users these days, then yes, I do find Mount-Manager to be an extremely useful and powerful little utility (even though Ubuntu come with one but it lack the features of M-M) nonetheless.
Use it with caution!, and good luck.
Available link for download
Wednesday, November 30, 2016
How to Edit Compiz Settings in Ubuntu 11 10 Oneiric Ocelot
How to Edit Compiz Settings in Ubuntu 11 10 Oneiric Ocelot
Compiz is an advanced 3D Graphics rendering manager + is one of the first to add the 3D compositing feature to the X-Windows GUI library. After sometime a bit of a rival came called Berryl (a fork of Compiz) but later it was merged back into it thus Compiz the current dominator. But that could change since Gnome Shell uses a one of its own 3D render called Mutter.
Anyhow, you can find a decent amount of GUI tools to edit Compiz settings but for some reason most of the GUI tool can drag you into a bit of a unstable system. And I think the reason is that when you change a setting or two using them, those 1 or 2 settings applies some certain amount of "child" settings inside them which means a lot of changes concerning the 3D rendering engine which leads to the unstable OS, perhaps.
Ubuntu Linux made some serious adaptations of Compiz with the introduction of their Unity desktop module and as almost all knows it has two versions.
Unity 3D: The default version which uses the 3D rendering by default to create a beautiful looking windows, resizing or minimizing effects, etc.
 |
| Compiz is useful, somewhat :)... |
Anyhow, the thing is, with Ubuntu 11.04 it was pretty easy to edit advanced settings of Compiz thanks to the Gconf-editor. But since Ubuntu 11.10 uses a lot of Gnome 3/Shell apps + Gnome Shell is migrating from Gconf-editor (a Gnome desktop configuration database editor GUI) to a new tool called Dconf-editor...
... The problems is that, while I was writing this post, Ubuntu is at its Beta 2 stage and I dont know whether things would change when they release it official (dont think so)... neither "Gconf" nor "Dconf" is installed by default in Ubuntu 11.10!.
Enough talking, lets do it!
1. So if you want to edit Compiz settings then you gotta first install Gconf-editor manually in Ubuntu 11.10 Oneiric Ocelot (Dconf is pretty new still and wont even include any settings concerning Compiz). To do that use the below command.
sudo apt-get install gconf-editor
2. Now, press "Alt" + "F2" keys and put the below command into the search box and hit enter.
gconf-editor
3. This should open a window similar to the below.
 |
| Ahh, the good & "old" friend... |
Anyhow, from your left go to: "apps" -> "compiz-1".
Thats it. Under "compiz-" -> "plugins", youll find all of those "hidden" Compiz OpenGL 3D rendering settings such as: animation, blur, composite, cube effects, decor, ezoom, etc.
 |
| Theyre all there! ... |
gconftool-2 --recursive-unset /apps/compiz-1And if you want to load the desktop with Unitys default settings (user profiles, launcher preferences, etc) then use the below command for that.
unity --resetYou can also use the below command which gives a short introduction to "Unity-Shell", etc (the command-line manual actually).
man unity
Also remember, since OpenGL 3D graphics rendering means deeper hardware integration thus always make sure that you have the up-to-date GPU drivers installed to get the best out of your system. Good luck.
Available link for download