Friday, April 28, 2017
How to Change Image on Mouse Hover Rollover Effect
How to Change Image on Mouse Hover Rollover Effect
You might have seen this sort of effect on many websites whenever you roll over on any image with your mouse the image changes to a different image well that's nothing not the script and not a CSS effect but a simple HTML coding would help you in achieving that effect so we are going to upload to images and one is the static image which is going to be the initial image and the second image is going to be the rollover image so when anyone hovers mouse over that image second image is going to pop up and it's going to replace the first image so this effect could be used in case you want to highlight any faded image.
- How to Change or Shuffle Ad Banners on Page Refresh
- Automatically Change Post Background Color’s on Refresh
- Automatically Change Background Color on Refresh in Blogger
Available link for download

Monday, March 27, 2017
HD Background in JPEG Image
HD Background in JPEG Image
Creative HD Background this is a very beautiful hd background high resolution image i am provide you via this blog post and i hope Creative HD Background you relay like it so can be free download Creative HD Background below image download link here.

Available link for download
Monday, February 20, 2017
How to Edit the Contents of an ISO Disk Image in Ubuntu
How to Edit the Contents of an ISO Disk Image in Ubuntu
As many knows already, you dont need any other application other than an archive manager if all you want is to view the contents (+ even changing the contents) of an ISO disk image file. But if you want more than that, such as mounting the content or changing it without loosing the boot-able core files (if any) then you will have to use a dedicate tool nonetheless.
And when concerning the contents of an ISO file that holds an operating system for instance then yes, you can still use an archive manager to add/delete files from it ... but if you do so, them most of the time after doing your changes, youll have an un-bootable ISO disk image.
The reason is simple. An archive manager is simply an archive manager thus (most of the time) it wont be able to edit the content without destroying the "Boot Record" portion that includes all the information needed for making it boot-able.
In that case, if you happened to use Ubuntu ;-), then theres an excellent Utility called "ISO Master" that lets you do exactly that.
 |
| Welcome to the master of the "ISO", kiyahooooooooooooo! ;) |
*. Add/Edit/Rename and delete the contents of an ISO file.
*. Only supports the ISO disk image extension (although you can read other extensions such as NRG and MDF, more later).

*. Has the ability to view certain types of files such as HTML and Text related ones.
*. Extract the contents (since a disk image is a sort of an archive).
*. Save/Delete or manually change the Boot-record according to your own preferences... are its main features.

You can install IsoMaster in Ubuntu 11.04 Natty Narwhal, 11.10, 10.10 and 10.04 by using the below command in your Terminal window.
sudo apt-get install isomasterRemember if you want to view some of the contents of the disk image file, say a configuration file or a Text file for instance. Then if you use a desktop other than Xfce, then make sure to go to its "Options" window and change the "viewer" command to "gedit" if you use Gnome classic desktop or with whatever your preferred editors name.
 |
| By default it uses the Editor "mousepad" (Xfces text editor). But I replaced with my own... |
Another thing, ISO Master also supports reading ISO, NRG and MDF files as well. But it can only save files the .iso format only.
Anyhow, if you want to create a bootable ISO disk image (CD/DVD, etc) file using files in your HDD from scratch or modify the content of an existing disk image (without destroying its core-properties such as above mentioned boot-entries) then ISO Master is certainly one of the best without a doubt. Its also free and even supports MS Windows too (Windows version is not free though :/).
Available link for download
Monday, February 6, 2017
How to Create a USB Bootable ISO image in Ubuntu
How to Create a USB Bootable ISO image in Ubuntu
Although the optical disk aint gonna be dead anytime sooner ;-) yet because of the popularity of netbooks or Tablet PC type electronic gadgets and when it comes to installing Ubuntu operating system in on them, USB devices (such as pen drives for instance) is the least expensive and sometimes the only way to perform the installation.
Even if you have an Optical drive, still trying a GNU/Linux liveCD on a USB drive is the best option in my opinion when compared with a original method of burning it into a CD/DVD because there are few advantages.
1. Theyre noiseless!:
Well, if you want the experience the best performance while trying the LiveCD and if youre burning a CD/DVD, then you should go for the maximum amount of Burning speed so the LiveCD/DVD will be able to perform tasks in a much speedier way.
But thatll also make it a bit noisy, dont you think?. But a USB drive is noiseless!.
2. Faster than CD/DVDs (most of the time):
Unless you have a bit older USB stick/pen-drive, most never pen drives have really higher MB output thus youll be experiencing a much more faster LiveCD "experience" in comparison with the CD/DVD method. Although not at its best, this will also help you to get a better idea of the actual (close) performance of the OS it self.
But as said, this might not always be the case since SATA or SSD drives are a hell lot faster than most of the USB drives nonetheless :).
Anyhow, in that sense, if you have already installed Ubuntu in your Netbook for instance, but wondering how to create/burn the recently downloaded never version of the Ubuntu ISO image into your USB disk... did you know that Ubuntu comes pre-installed an application called "Usb-Creator" (which is basically a GTK front-end that uses the "usb-creator" command-line tool) that lets us does exactly that!.
Main features...

*. As said, its a default app thus if youre running a never version of Ubuntu, this you dont have to manually install it (comes pre-installed in Ubuntu 8.10 and above).
*. Lets you burn Ubuntu ISO images to any USB media. Although Im not sure but you might also be able to use a different GNU/Linux (other than Ubuntu) with it too... but not sure though.
*. Save your documents: Unlike with a LiveCD, with a USB disk, by using this tools we can manually assign how much of MB to be reserved for saving our documents that we create while using the Live Ubuntu OS which we can retract at a later time. Again this is impossible with a LiveCD.
Requirements...
*. You must have an Ubuntu version 8.10 or above.
*. At last 1GB of free space.
*. The image has to the Ubuntu desktop edition (which is the most commonly downloaded one anyhow).
As said, to launch this, you first need a Computer thats already have Ubuntu installed.
Then log-into your desktop and put an insert an empty USB disk to your computer. Then press "Alt" + "F2" keys and put the below command and press the enter key.
usb-creator-gtk
1. Now, this should open up a window similar to the below one. From the GUI, under "Source disk image...", open your ISO image by navigating to the location OR if you have an Optical drive with a LiveCD already loaded, this itll display it too and let you burn the content of that LiveCD directly to the USB disk as well.
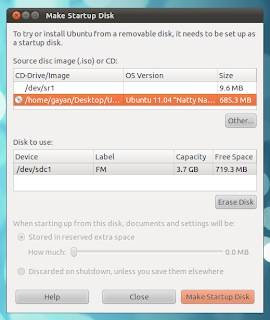
3. As with my screenshot, if you found that the options to manually enter documents space is disabled, thats because (in my case) I dont have at least 1GB of space left.
4. So in that case, backup all your data and then simply press the "Erase DISK" button to remove all your data on the USB disk (warning: this will remove all of the current data on the USB drive!).
And then you should be able manually assign the space for your documents data OR completely disable that function by clicking on the "Discarded on shutdown, unless you save them elsewhere" check mark.
5. After making all the changes, just press "Make Startup Disk" button and the Usb-Creator should automatically "burn" the Ubuntu ISO desktop image to your USB disk!.
Well, thats about it. Before booting using the USB disk, make sure youve setup the BIOS to use USB as the default boot-device location (I know you knew that but just in case :D). Good luck.
Available link for download
Wednesday, February 1, 2017
How to color a black white image Photoshop CS6 tutorials
How to color a black white image Photoshop CS6 tutorials
 |
| How to color a black & white image , Photoshop CS6 tutorials |
In this tutorial that i have put it in YouTube you will learn how to color your black and white image , it is very simple and it will not take a time from you .
What you need to color you image just a Photoshop any version you have and you know how to select hair and eyes skin lips and you see all this in the video .
Enjoy to watching and dont forget to subscribe to my channel for more video.
dont forget to like my page FaceBook
Available link for download
Wednesday, January 11, 2017
How to make an image look like an artistic illustration in Photoshop
How to make an image look like an artistic illustration in Photoshop
Full Tutorial

Available link for download
Wednesday, January 4, 2017
How Place floating image back to top icon on Blogger
How Place floating image back to top icon on Blogger

Has not been one day since the countless pairs icon Back to the top, it also has many colleagues who ask how of the way. Icon back to the top is actually useful to leap from page to page down the top, so colleagues will not have to do ScrollBar on the browser.
By the way, are also easy to install, please lead on the HTML page, and then place the code on the tag below </ body>
<a href=# style=display:scroll;position: fixed; bottom:5px;right:5px; title=Back to Top><img src=http://1.bp.blogspot.com/_C6KkooKXCEw/STDLOei9LKI/AAAAAAAACnw/udvHQji9acI/s400/Jumptotop2.gif/></a>
What relationship with Float image?

Banner Position Top-Left
<a href=http://www.linktujuan.com style=display:scroll;position: fixed; top:5px;left:5px; title=ganti title anda disini ><img src=http://2.bp.blogspot.com/_C6KkooKXCEw/STH-1kcwVPI/AAAAAAAACoE/1ai6aC5ypu8/s400/banner.gif/></a>
Banner Position Top-Right
<a href=http://www.linktujuan.com style=display:scroll;position: fixed; top:5px;right:5px; title=ganti title anda disini><img src=http://2.bp.blogspot.com/_C6KkooKXCEw/STH-1kcwVPI/AAAAAAAACoE/1ai6aC5ypu8/s400/banner.gif/></a>
Banner Position Bottom-Left
<a href=http://www.linktujuan.com style=display:scroll;position: fixed; bottom:5px;letf:5px; title=ganti title anda disini><img src=http://2.bp.blogspot.com/_C6KkooKXCEw/STH-1kcwVPI/AAAAAAAACoE/1ai6aC5ypu8/s400/banner.gif/></a>
Banner Position Bottom-Right
<a href=http://www.linktujuan.com style=display:scroll;position: fixed; bottom:5px;right:5px; title=ganti title anda disini><img src=http://2.bp.blogspot.com/_C6KkooKXCEw/STH-1kcwVPI/AAAAAAAACoE/1ai6aC5ypu8/s400/banner.gif/></a>
If you want to play with the code above, partners can set their own distance with the position of the image set code bottom: 5px; right: 5px; if not satisfied also try a little play with it would position: fixed; with the position: absolute; position: relative; and position: static;.
im oom, i blogging stuff
Available link for download
Thursday, November 24, 2016
How to Mount an ISO Disk Image in Ubuntu
How to Mount an ISO Disk Image in Ubuntu
ISO image file is actually a form of an archive. Thats why if we have an archive manager installed in whatever your OS is, we can read the content of an ISO disk image file with ease.
Although unlike other standard archive formats such as .tar.gz, .rar, .zip, etc the data inside an ISO disk image is not compressed thus we can make an ISO image out of any CD/DVD or even Blu-Ray disk by using a disc authorizing software on-the-fly, without having to wait till the data get compressed.
It has many benefits such as, say that you have a disk thats filled with thousands of image files and you want to copy that disk to your HDD to be burned to another disk at later times. If you however follow the usual copy-paste method in this instance, it should take some considerable amount of time to copy the whole disk content because the OS has to carefully copy and paste hundreds or thousands of individual files into your HDD, one by one.
However, if you went with the "create an ISO image" using your burning software, then itll only take extremely less amount of time which is somewhat closer to copying a single file thats equal to the size of the CD/DVDs data that youre trying to copy!.
Another benefit of an ISO disk image is its ability to mount itself as a "virtual disk drive". Its just like burning an ISO disk to a CD/DVD and then after the burning process is over, when you open the disk, you no longer see a single ISO file but the true content of ISO file itself.

Anyhow, if all you need is to mount the ISO file just so you could access its content with your file manager (without the use of any archive manager whatsoever) just like with accessing a partition, etc... in Ubuntu, then theres a small yet extremely useful tool called "Gmount-iso".
This is actually GTK written GUI aimed at the Gnome desktop but you can use it in the latest Unity desktop + many others without any problems whatsoever as well.
 |
| After mounted, you can browse/open the ISO image just like a normal CD/DVD drive, using the file manager... |
*. Extremely simple GUI.
*. Mount/Unmount ISO images.
*. Manually assign the mount location.
*. Mount more than one image.
Yep... thats about it. You can install Gmount-iso in Ubuntu 11.04 Natty Narwhal, 10.10 and 10.04 (perhaps in the latter version too) by entering the below command in your terminal window.
sudo apt-get install gmountisoI dont think anyone needs a guide on how to use it :). But if youre having troubles, just throw in some comments!.
Available link for download
Thursday, October 20, 2016
How to Play GIF Images in Google Image Search Results
How to Play GIF Images in Google Image Search Results
GIF Images are the animated images that you can use to make your presentations or even blog posts more interactive. Now you can create some nice GIF images on your own, share them on Facebook and even apply them as your wallpapers on your Windows OS. But in case you are not that creative in making a nice GIF image then you can get some for free from Google.
Available link for download