Hello friends In this session i am going to tell you how to install Worldpress in Linux server, Wordpress is open source blogging tool and CMS based on PHP and mysql which runs on a web hosting service. Wordpress is use by more then 18.9% of the top 10 million website.
In order to install wp we have to configure theweb server& mysql server.
So now i am going to configure mysql database,
As you can see sql database has been configured successfully and time to download Wordpress and configure the same, I already downloaded wordpress zip file,
Ok guys we successfully configured the wordpress config file and added the our mysql database, user and password, all configuration done now time to move and install wordpress
Go to you browser and type http://localhost (i did not configure dns server so i put localhost if you already install dns server then type you website name ) and fill required information
After filling the same click to install
Bingo :) wordpress installed successfully :P. Now time to login...
Here we go :D
I hope you like my tutorial if yes please share with others, if you have any doubt or quire feel free to ask me
Prepaid International Mobile Broadband Services Get high speed wireless Internet access on your laptop in countries around the world by using one of these international mobile broadband rental companies. Get high speed wireless Internet access on your laptop in countries around the world by using one of these international mobile country ... Read Article
Email And Internet Access For The Traveler In Europe Things you need to know about email, Internet access and Cybercafes in Europe. By James Martin. Europe Travel Expert Share Pin Tweet Submit Stumble Post Share Most cybercafes offer reasonably fast connections these days, ... Read Article
Evaluating Fast Food Nutrition And Marketing To Youth: There were fewer positive trends in fast food marketing to teens. The overall nutritional quality of fast food products advertised to teens on TV did improve. on the internet and 29% on magazines, but only 40% on TV advertising. ... Read Content
List Of countries By Internet Connection Speeds - Wikipedia ... Is "more representative of Internet connection capacity". which is over 40% faster than the next ranked country, South Korea's speed is almost six times faster than the world average of 3.8 Mbit/s, and more than twice as fast as the United States at 10 Mbit/s. Akamai 2014 rankings. ... Read Article
Technology And Globalization Technology and Globalization Using these technologies, governments today can provide citizens with fast felt that it was important for them to be connected to the rest of the country and to get the latest national news on the ... Get Doc
Question Info - Schoolwires Your neighbor has moved to another country. Therefore, it needs an Internet connection that is fast and always available. What type of Internet connection does Wide World Importers You hear modem tones when your friend's computer sends a request to the Internet service provider (ISP) ... Content Retrieval
Social Security Numbers For Children - The United States ... 5. Children age 12 or older: Anyone age 12 or older who requests an original . Social Security number must appear in person for an interview, even if a parent ... Access Full Source
Pingdom Website monitoring service Pingdom provides, arguably, the most granular control over website monitoring for developers and operations professionals, but its intricate technical detail and utilitarian interface can result in a steep learning curve for business users. ... Read News
Form W-7 (Rev. August 2013) You must file a tax return with Form W-7 unless you meet one of the exceptions (see instructions). a. Nonresident alien required to get ITIN to claim tax treaty benefit. b. Nonresident alien filing a U.S. tax return. c. Enter treaty country ... Fetch Here
Technology, Globalization, And International Competitiveness ... Key global trends which are making it more difficult for developing countries to replicate the fast growth experience of the countries mentioned, In developing countries, strain the country’s ability to compete internationally and to attract export. ... Return Doc
Chapter 4 Business Buying Behavior - Saylor Academy In the last chapter, we talked about the buying behavior of consumers Fast Company, December 19, 2007, organization or can they be in another region of the country or in a foreign country? The vendors ... Retrieve Full Source
TEXAS DEPARTMENT OF PUBLIC SAFETY It is the policy of the Texas Department of Public Safety (DPS contract with MorphoTrust USA to provide statewide electronic fingerprinting through DPS FAST locations operated by IdentoGO. Fingerprint Applicant Services of Texas ... Read Content
AUSTRALIA - Department Of Health 1 1. Executive Summary One of the greatest public health challenges confronting Australia and many other industrialised countries is the obesity epidemic. ... Retrieve Full Source
How to get more out of your home Internet access by testing and tweaking Internet connection settings. About.com. How to test and increase your Internet speed at home/your home office. By Melanie Pinola. Mobile Office Expert Share fast internet access is even more important. ... Read Article
Internet In Africa - Wikipedia, The Free Encyclopedia The Internet in Africa is limited by a lower penetration rate when compared to the rest of the world. the leading Subsaharan country in telecommunication and Internet development is Kenya. that between 2004 and 2007 grew three times as fast as the world's average. ... Read Article
Tax Refund Get Content Here</a><br /></p></div><div style="clear: both;"></div><div style="margin: 10px 0;"><a href="http://www.bilimevi.com/rehber/fotograflar/boston%20north%20end.jpg" target="_blank"><img src="http://ts3.mm.bing.net/th?id=H.4665555458392886&pid=15.1&H=106&W=160" style="float: ... View Video
Get Started - AT&T If connections are secure and you are still unable to connect to the Internet, High Speed Internet Residential Gateway Self-InStallatIon GuIde ATT102400722 (9/10) (UV HSIA 3800 CSI GUIDE) Hav. you can access the Internet at thousands of AT&T Wi-Fi Hot Spots across the country. ... Access This Document
MEDIUM AND LONG-TERM SCENARIOS FOR GLOBAL GROWTH AND IMBALANCES Fast growth in China and India and United Kingdom. In addition, for a typical OECD country, additional offsets of 3 to 4% of GDP will have to be found over the coming 20 “Long-Term Growth Scenarios”, OECD Economics Department Working Papers, forthcoming. Joumard, I., C. André and C ... Retrieve Doc
SMTP Error Codes - Answers That Work Before spam became the scourge of the Internet, there are no SMTP error codes dedicated to anti-spam errors. As a result, SMTP Error 451 is now increasingly also used So typically you will get an “SMTP Error 550 571 ... Fetch This Document
Things You Should Know About Divorce In Arizona Divorce in Arizona This booklet is designed to give you general information about getting a divorce in Internet at this website address: http://www.supreme.state.az.us/selfserv/forms.htm Q. Does the Response have to be served like the Petition? ... Get Document
Multiple Choice Questions - Kansas State University More than seventy percent of the population of fast growers lives in . a. China. b. United States internet users per 1,000 people in middle income countries Which of the following country has 25 percent of the world's estimated oil reserves and the lowest cost production as well as a ... Get Content Here
Internet - Wikipedia, The Free Encyclopedia This article is about the worldwide computer network. For other uses, see Internet (disambiguation). ... Read Article
DROID RAZR HD & DROID RAZR MAXX HD BY MOTOROLA DROID RAZR HD & DROID RAZR MAXX HD BY MOTOROLA pick a topic, get what you need. Back Next Menu More At a glance † Get fast access to main settings: are not available in your country, ... View Document
15 Economic Facts About Millennials - The White House 15 ECONOMIC FACTS ABOUT MILLENNIALS The Council of Economic Advisers access to the Internet during their formative years. remains a challenge for Millennials and for the country in general, ... View Doc
Download Setting Up The Bravia Internet Video Link Button to select a different country. 7 Attach Cable Cover Slide the cable cover back into place. B T OU DC IN 9V N LA Front of Receiver z For instructions on attaching to the TV, see the BRAVIA Internet Video Link is a gateway that brings Internet videos ... Get Doc
How to Install GVIM a powerful text editor in Ubuntu 11 04 Natty Narwhal 10 10 and 10 04
GVIM is the graphical "implementation" of the command-line text editor (an IDE actually) called the Vim. Although may not certainly be as "connected" as with the GNU EMacs, but Vim text editor also has a quite long history with GNU/Linux thus it comes pre-installed by default in almost all the GNU/Linux distributions.
But for the obvious reason of not having a GUI, Vim (which is also based on another editor called "Vi") is not that popular among the typical GNU/Linux users but other advanced boys and gals such as system administrators still use it quite often since it allows us to edit any text (+ editing programming language code files) file without having to log-into a graphical user interface to this day nonetheless.
In short, it a GUI written using the GTK+ tool-kit (aimed at Gnome desktop, but you can use it in any desktop you want), but since it uses the Vim as the "engine", youll be getting almost all of its features in a very user-friendly graphical environment!.
Main features...
*. Change font (size, bold, italic, etc).
*. Find and replace.
*. Undo/Redo.
*. Automatic spell checking.
*. Open multiple windows by splitting the window by horizontal or vertically.
*. A "file explorer" of its own which lets you locate and load files to the window for editing.
The "command-line" type, file explorer to the left...
*. Line numbering support.
*. Text wrap.
*. Send to print... are among the features that interests the standard users.
As mentioned, Vim is actually a programmer friendly text editor, thus GVIM also lets you do other things like Syntax editing, set compilers, "Make" files (compiling), etc which are again, not that useful for the usual users.
You can install GVIM in Ubuntu 11.04 Natty Narwhal, 10.10 and 10.04 by using the below command in your Terminal window.
sudo apt-get install vim-gtk
But, just like with GNU/Emacs, this is not for everyone. For instance, if you enter its settings window, then almost all the settings are activated using commands! rather than graphical tools.
But still, if you usually deal with a lot of Syntax editing or HTML/XML editing... then GVIM is a fast and feature-rich front-end to the original Vim "engine" nonetheless.
But as a final verdict, in my humble opinion, if youre looking for something to replace the Gedit type text editor for instance, then you should have a look at something like the Leafpad or Mousepad or even the awesome FocusWriter will certainly suite rather than the GVIM.
How to Install Sysinfo in Ubuntu 11 04 Natty Narwhal 10 10 and 10 04
Although Ive already talked about a PC hardware information "gatherer" for GNU/Linux called Hardinfo which is pretty darn good btw. But for one main reason I quite liked another one called Sysinfo because of its simplicity and well designed "categorized data structure" (didnt know how else to put it :D).
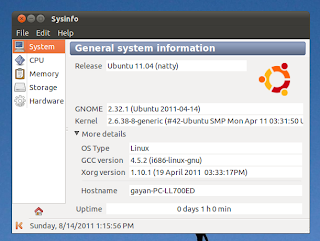
The main GUI of Sysinfo is very minimalistic yet the application itself looks very professional. It has a nice Welcome screen (animated, well, who cares!, but that "approach" a bit rare in GNU/Linux apps, dont ya think? ;-) ) and all the hardware of your PC/Laptop are categorized quite nicely to the left side of the screen too.
Main features...
*. Has five (5) basic categories - System, CPU, Memory, Storage and Hardware.
*. Shows a huge list of information related to both your Hardware and software such as the desktop version and its kind (Gnome, KDE, Xfce and LXDE, etc).
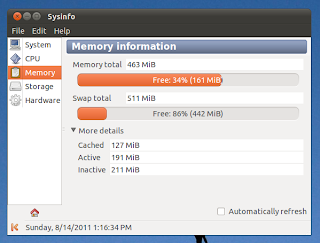
*. Memory Usage and Swap space, Cached memory, etc.
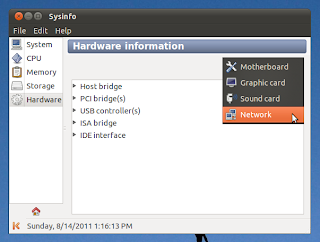
*. Under storage youll find all the storage details such as HDD, CD/DVD drives, USB or SCSI drive BIOS versions, vendor, capacities, etc.
*. If you want more information, then just click on the "Hardware" tab and you can either choose from the drop down menu (as shown in the below screenshot) to filter out certain hardware, etc with ease as well.
You can install Sysinfo in Ubuntu 11.04 Natty Narwhal, 10.10 and 10.04 by using the below command in your Terminal window.
sudo apt-get install sysinfo
After the installation you can run it from: "Applications" -> "System Tools" - "Sysinfo" or just press "Alt" + "F2" keys and enter the below command into the box and press enter.
How to Customize Pen Drive as Ram Memory in Windows 7
Programs that require lots of memory may not run smoothly , if your PC has a low memory. To avoid this make your pen drive/USB of large size as RAM, which will make your system faster. It can be possible with any kind of Windows operating system, all you need is a pen drive of minimum 1GB memory ,better to prefer 4GB.To know how to do this, follow below steps.
1.Format your Pen Drive first
2.. Insert the Pen Drive with 1GB at least in the USB port, Wait for the PC to detect the pen drive.
3. Right click on My Computer--> Properties.
4. Select Advanced System Settings.
5. Select Advanced—> Performance –>Settings
6. Under Performance Options Select Advanced –>Virtual memory Change
7. Uncheck Automatically manage paging file size for all drives Click on Custom Size.Select your Pen Drive . Enter the same in the Initial and Max columns in the Custom Size .The size depends upon your free memory capacity of your pen drive. So you can change this limit according to your pen drive size.
8. Click on Set button, then click on OK.
9. Now restart your PC.Finally check the general start up time and also speed of your PC.This trick will surely improve the performance of your computer and increase operational speed in low cost.
Facebook mobile app Version 3.9 can now save pictures from facebook itself to your phone storage.
How to save photo?
View the picture you want to save.
Tap the MENU key.
Then tap Save photo
How to locate the photo(s) youve been saved?
The photos will be saved to the default folder created by Facebook. Go to your My files - DCIM - Facebook
Another good feature available in this version is that you can now add multiple pictures for your status update. To do this, once youre in the Write post window,
tap the camera icon at the bottom.
Browse on the picture list and tap to checked the picture(s) you want to added. You will see the thumbnail preview of your selected photo(s).
If ever youve missed to add other pictures or you wanted to removed some, do the same procedures youve done in adding pictures, tap again the camera icon at the bottom then select/deselect the pictures.
How to Create a Photo Caricature in Adobe Photoshop
What Youll Be CreatingCaricatures are a fun alternative to traditional portraits. The idea is to comically exaggerate particular features to create a humorous representation of that person. Adobe Photoshops transform, warp, and liquify features are perfect for creating caricatures from a photographic portrait. This tutorial is part of a larger set of instructions found in the Tuts+ course, Fluid Photo Manipulation: Transform, Warp, and Liquify.
Tutorial Assets
This tutorial requires two files. Both are available through the Download Attachment link found with this tutorial. The files you will need are:
A portrait photo. Feel free to use one of your own, or use the same one I used.
A textured background. I created this one using the Adobe Texture Paper Pro extension.
1. Basic Photo Preparation
The essential technique for creating a caricature is to find elements that are already naturally pronounced, and exaggerate them to a comical degree. In our starter photo here, the young mans jaw line is rather large, and his smile is very prominent. The horn-rimmed glasses are noticeable and the hairline looks like its beginning to recede. These are all aspects of his portrait we can have fun with.
Step 1
The solid white background of the portrait makes it easy to extract the figure from the background. Use the selection technique of your choice—I used the Quick Selection Tool (W) to craft the selection—and then go to Layer > New > Layer Via Copy (Control-J) to create a cutout layer of the man.
Step 2
Its much easier to work with particular features if they are isolated. So use the same technique to cut out the following individual elements. The body and clothing layer should follow the neckline of his shirt. The head/neck layer should fit nicely inside the neckline of the shirt Keep the selection large and rough when creating the chin layer—we will make it blend in nicely later. Keep the mouth layer selection outside the lip area so theres room to blend it in later. Likewise, keep the selection around the nose rough, with plenty of room to spare. Keep the selection around the glasses nice and tight, and include the eyes. Keep the selection tight around the outside contour of the ear, but give yourself room to work with on the inner side.
Step 3
Just to keep things as flexible as possible, lets transform each layer into a Smart Object. Grab each layer individually and go to Layer > Smart Objects > Convert to Smart Object.
2. Transform and Warp
Now that the different features are all on their own layer, we can begin transforming them into an exaggerated caricature. Use the flexibility of the Smart Objects to work with different size combinations to get a humorous effect.
Step 1
A common caricature technique is to make the head extremely large in proportion to the body. To accomplish this, shrink the body layer down significantly with Edit > Free Transform.
Step 2
Use Edit > Transform > Warp to begin shaping the head layer. Fit the neck into the neckline of the shirt and inflate the top of the head. The goal of this step is just to establish the basic shape of the head, and that serves as a foundation for the other layers to build on.
Step 3
Distort the chin layer to elongate it and sharpen it slightly. Try to keep the top aligned so the seams are not overly visible.
Step 4
Make that big grin even larger by stretching out the mouth layer.
Step 5
Caricatures frequently make noses extremely large and exaggerated. Big noses just look funny! Expand the nose layer to comical proportions—even if it overlaps the mouth, its OK.
Step 6
The glasses layer requires more attention than the simple scaling we used with the other features. The Edit > Transform > Warp tool can be used to help fit the expanded frames onto his face.
Step 7
All the distortion has nearly eliminated the ear on the base head layer. Good thing we have an ear layer to scale up so that it can support the heft of those glasses!
Step 8
Now add a Layer Mask to each layer and use a soft brush with black paint to blend the individual elements into a cohesive whole. Masking the chin is the most challenging, as you have to work around the hairs of the beard. Just use a smaller sized brush and work carefully. Heres a shot of the chin layer next to the mask layer used to blend it.
Step 9
Add a new layer above all the cutout layers and use the Spot Healing Brush (J) set to Sample All Layers to paint over any obvious seams or trouble areas that escaped the masking process.
3. Fluid Faces
Next up is the true power behind the caricature process. Its the infamous Liquify feature. Weve already done much of the warp work with the different transformations, but its the Liquify feature that is really going to create a fluid, funny, exaggerated appearance. The Liquify tools are powerful and can be unpredictable, but fortunately the feature supports Smart Filtering, so theres no worries!
Step 1
Select all of the cutout layers and the seam cover layer and merge them into a single Smart Object with Layer > Smart Object > Convert to Smart Object.
Step 2
Go to Filter > Liquify. When the dialogue box comes up, check the Advanced Mode to reveal additional controls.
Step 3
Use the Forward Warp Tool with a brush size around 200 to increase the size of his forehead. Gently push the skin area up towards the hairline.
Step 4
Use the Bloat Tool to click a few times on the tip of his nose to make it look more bulbous.
Step 5
Use the Freeze Mask Tool to highlight the frames of the glasses. This will prevent the frames from distorting while we work with the eyes.
Step 6
Use the Forward Warp Tool again to exaggerate the shape of the temple area, and the Bloat Tool to create a slightly larger shape to the eyes—just be sure to reduce the size of the brush to be similar in size to the eyeballs. When finished, click the None button in the Mask Options to unfreeze the masked area.
Step 7
Extend the chin a bit more using the Forward Warp Tool and create a more rounded, bulbous end with the Bloat Tool.
Step 8
Finally, make his smile even bigger by using the Forward Warp Tool to push the corners of his mouth up into the folds on his cheeks. Just be careful not to warp the shape of the teeth. Apply the Liquify effect and your caricature should look something like this.
4. Artistic Background
Now that weve twisted up this poor mans face, lets make it look more like a painted image. Well start by having a more artistic background.
Step 1
Add a Layer Mask to the caricature layer and use a textured brush to fade the bottom of the layer out. I chose the Sponge Brush Projection brush preset here. Reduce the Brush Opacity setting to around 40% so the texture builds up gradually.
Step 2
Open the BackgroundTexture.jpg file from the tutorial assets and place it as a layer underneath the caricature layer.
Step 3
Add a new layer over the textured background. Use the same textured brush from the mask work to add in a white brushed border effect.
5. Painted Effect
Now we are ready to transform the caricature itself into a painting. We want to retain some of the photographic qualities, but still give the impression of a hand-painted piece. This is easily done using a smudge painting technique.
Step 1
Smaller details tend to disrupt the smudge painting process, so its best to smooth them out first. Go to Filter > Blur > Smart Blur. Use a Radius of 2.0 a Threshold of 10.0, with Quality set to High.
Step 2
The highlights in the photo appear a little bright. Correct this by clipping a Curves Adjustment Layer to the caricature layer and using the Curves to decrease the bright areas.
Step 3
Create a new layer at the top of the layer stack. Grab the Smudge Tool with a Brush Size around 40 pixels. Set the Strength to 80% and check the Sample All Layers option. Then begin smudging along the major features of the image. Follow along with the natural grain of the skin to keep the appearance very fluid.
Step 4
Reduce the brush size to about 5 pixels and begin smudging along the smaller details of the image like the eyebrows, individual strands of hair, his eyes, and his teeth.
Step 5
Create a merged layer of the smudge layer, the caricature layer and the adjustment layer by selecting all of them and holding down the Alt key while going to Layer > Merge Layers (Control-E). Then go to Filter > Other High Pass set the Radius to 5.0Pixels. Call this layer Details.
Step 6
Change the Details layer Blending Mode to Overlay, reduce the Opacity to 78%, and then go to Layer > Layer Mask > Hide All. Use a soft, white brush on the mask to reveal the details in the eyes, eyebrows, nose, mouth, and beard.
Step 7
Add a new layer called Dodge/Burn and fill it with 50% gray through the Edit > Fill feature. Set the Blending Mode to Overlay and then use a soft Black brush at 30% Opacity to simulate a Burn effect. Switch to White to simulate a Dodge effect.
Step 8
Add a final color effect. First create a merged layer of all the layers by holding down Alt while going to Layer > Merge Visible. Then go to Filter > Camera Raw and set the Contrast to +10, Clarity to +22, and the Vibrance to +48.
Done!
And now you are finished! Behold your amazing photo caricature work. Now take these techniques and go apply them to photos of your friends and family to create some fun, unique, and personal portraits!