Thursday, April 13, 2017
how to make a bootable USB Windows 7 and other Windows versions
how to make a bootable USB Windows 7 and other Windows versions
Free software that we will use to create a bootable USB this time it was Rufus.
1. Rufus is very light and most rapidly than software like. The file size was very small, only about 400 KB only.
2. Easy to use to create a bootable USB from a bootable ISO file (Windows, Linux, etc.)
3. It has a variety of other functions such as low-level utility, flash the BIOS or other firmware.
4. Download Rufus
Download Rufus 1.1.3
5. Make sure the USB drive has been installed on your computer, then run rufus_v1.1.3f.exe
6. Make sure you check the "Create a Bootable Disk Using". If you want to create a bootable USB Windows 7 or any other version, use the "ISO Images" as the source. Then click the browse button that is next to it.
7.Pilih ISO file you want and click "Open".
8.Klik start to begin to create a bootable flash.
its easy right ...
Available link for download

Monday, February 6, 2017
How to Create a USB Bootable ISO image in Ubuntu
How to Create a USB Bootable ISO image in Ubuntu
Although the optical disk aint gonna be dead anytime sooner ;-) yet because of the popularity of netbooks or Tablet PC type electronic gadgets and when it comes to installing Ubuntu operating system in on them, USB devices (such as pen drives for instance) is the least expensive and sometimes the only way to perform the installation.
Even if you have an Optical drive, still trying a GNU/Linux liveCD on a USB drive is the best option in my opinion when compared with a original method of burning it into a CD/DVD because there are few advantages.
1. Theyre noiseless!:
Well, if you want the experience the best performance while trying the LiveCD and if youre burning a CD/DVD, then you should go for the maximum amount of Burning speed so the LiveCD/DVD will be able to perform tasks in a much speedier way.
But thatll also make it a bit noisy, dont you think?. But a USB drive is noiseless!.
2. Faster than CD/DVDs (most of the time):
Unless you have a bit older USB stick/pen-drive, most never pen drives have really higher MB output thus youll be experiencing a much more faster LiveCD "experience" in comparison with the CD/DVD method. Although not at its best, this will also help you to get a better idea of the actual (close) performance of the OS it self.
But as said, this might not always be the case since SATA or SSD drives are a hell lot faster than most of the USB drives nonetheless :).
Anyhow, in that sense, if you have already installed Ubuntu in your Netbook for instance, but wondering how to create/burn the recently downloaded never version of the Ubuntu ISO image into your USB disk... did you know that Ubuntu comes pre-installed an application called "Usb-Creator" (which is basically a GTK front-end that uses the "usb-creator" command-line tool) that lets us does exactly that!.
Main features...

*. As said, its a default app thus if youre running a never version of Ubuntu, this you dont have to manually install it (comes pre-installed in Ubuntu 8.10 and above).
*. Lets you burn Ubuntu ISO images to any USB media. Although Im not sure but you might also be able to use a different GNU/Linux (other than Ubuntu) with it too... but not sure though.
*. Save your documents: Unlike with a LiveCD, with a USB disk, by using this tools we can manually assign how much of MB to be reserved for saving our documents that we create while using the Live Ubuntu OS which we can retract at a later time. Again this is impossible with a LiveCD.
Requirements...
*. You must have an Ubuntu version 8.10 or above.
*. At last 1GB of free space.
*. The image has to the Ubuntu desktop edition (which is the most commonly downloaded one anyhow).
As said, to launch this, you first need a Computer thats already have Ubuntu installed.
Then log-into your desktop and put an insert an empty USB disk to your computer. Then press "Alt" + "F2" keys and put the below command and press the enter key.
usb-creator-gtk
1. Now, this should open up a window similar to the below one. From the GUI, under "Source disk image...", open your ISO image by navigating to the location OR if you have an Optical drive with a LiveCD already loaded, this itll display it too and let you burn the content of that LiveCD directly to the USB disk as well.
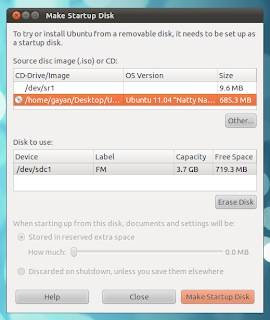
3. As with my screenshot, if you found that the options to manually enter documents space is disabled, thats because (in my case) I dont have at least 1GB of space left.
4. So in that case, backup all your data and then simply press the "Erase DISK" button to remove all your data on the USB disk (warning: this will remove all of the current data on the USB drive!).
And then you should be able manually assign the space for your documents data OR completely disable that function by clicking on the "Discarded on shutdown, unless you save them elsewhere" check mark.
5. After making all the changes, just press "Make Startup Disk" button and the Usb-Creator should automatically "burn" the Ubuntu ISO desktop image to your USB disk!.
Well, thats about it. Before booting using the USB disk, make sure youve setup the BIOS to use USB as the default boot-device location (I know you knew that but just in case :D). Good luck.
Available link for download
Sunday, January 29, 2017
How To Create Bootable USB Drive
How To Create Bootable USB Drive
Nowadays, ultra slim laptops are coming without any optical drives in them. Although, this helps the manufacturers to make lighter devices but this is the major problem among the users because they can’t install a fresh copy of Windows or any other operating system in these type of devices.
Learn-How To Create Bootable USB Drive
- To make a bootable USB drive then at first, you have to install and download a program, named as “WinToFlash“. You can easily download this program from there official Site.
- After downloading and installing this program, open it.
- When you open the program you will see two modes, namely “Wizard mode” and the other “Advanced mode“.
- Select the “Wizard mode” and then click on the “Windows Setup Transfer Wizard” icon.
- After doing that, click on “Next” button.
- Now, in the “Windows File Path” option, you have to select the CD/DVD drive which contains your OS or you can also select the ISO file of your OS.
- Then, on the “USB Drive” box, select your USB drive and click “Next” button.
- After that, Read the Agreement and Select “I Accepted The Terms Of The License Agreement” and click on “Continue” button.
- Now, click on OK and wait while the program transfers the OS setup to your USB drive.
- Click on “Next” and then “Exit“. That’s it, now you have created your own bootable USB drive. Now you can install windows from a Bootable USB Drive.
Conclusion
Available link for download
Tuesday, November 8, 2016
How to create a bootable Windows 7 USB flash drive
How to create a bootable Windows 7 USB flash drive
 You may know this fact that,we can boot windows from any sources like other networks,usb,cd etc.In this article,I will show you how to load the Windows installation on to your USB flash drive and make it bootable just like the DVD.Booting Windows from a USB flash drive has several advantages.First of all, the overall speed of the installation process will increase significantly, carrying a USB stick is much more convenient than a DVD, and finally it becomes possible to install the OS even on those systems that do not have a DVD drive, such as a notebook pcs or systems with only cd drives.
REQUIREMENTS
- USB flash drive with a minimum capacity of 4 GB.
- Windows 7 set-up DVD.
STEPS TO MAKE A BOOTABLE USB
1. Plug-in your USB flash drive to USB port.
2. Open Command Prompt with admin rights. Use any of the below methods to open Command Prompt with admin rights.
- Type cmd in Start menu search box and hit Ctrl+ Shift+ Enter.
- Go to Start menu > All programs > Accessories, right click on Command Prompt and select Run as administrator.
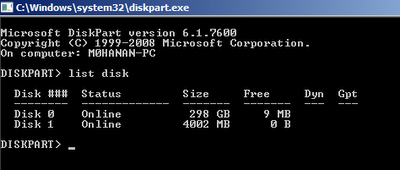
3. Type the command DISKPART and hit enter to see the below message
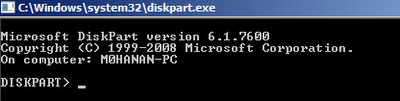
4. Next type LIST DISK command and note down the Disk number (ex: Disk 1) of your USB flash drive. In the below screenshot my Flash Drive Disk no is Disk 1.( Disk 0 will be your harddisk )
5. Next type all the below commands one by one. Here I assume that your disk drive no is “Disk 1”.If you have Disk 2 as your USB flash drive then use Disk 2.Refer the above step to confirm it.Make sure that each is completed successfully.Refer the screenshot given below to know possible success messages
SELECT DISK 1
CLEAN
CREATE PARTITION PRIMARY
SELECT PARTITION 1
ACTIVE
FORMAT FS=NTFS QUICK
ASSIGN
EXIT
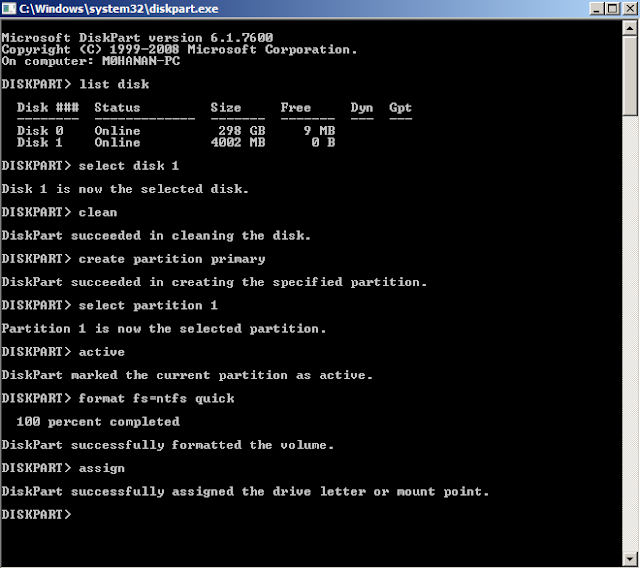
Don’t close the command prompt as we need to execute one more command at the next step. Just minimize it.
6. Next insert your Windows7/Vista DVD into the optical drive and check the drive letter of the DVD drive. Here my DVD drive letter is "I" and USB drive letter is “J” (open my computer to check this).
7. Maximize the minimized Command Prompt in the 4th step.Type the following command now:
CD BOOT and hit enter.
( replace J with your usb drive letter )
Once you enter the above command you will see the below message.
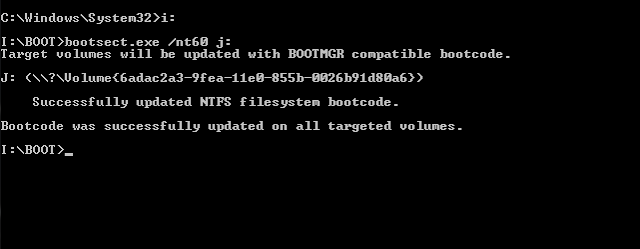
9. Now this is the final step,just Copy all the contents of Windows 7/Vista DVD to the USB flash drive.
10. Thats it you are done !!!!!!! Your USB drive is ready to boot and install Windows 7/Vista. Just change the boot priority at the BIOS to USB from the HDD or CD ROM drive.( normally F12 or F8 ,shortcuts for selecting the boot device )
If you found this article useful please feel free to pass your comments.All your feedbacks are precious.
Available link for download