Friday, April 28, 2017
How to Change Image on Mouse Hover Rollover Effect
How to Change Image on Mouse Hover Rollover Effect
You might have seen this sort of effect on many websites whenever you roll over on any image with your mouse the image changes to a different image well that's nothing not the script and not a CSS effect but a simple HTML coding would help you in achieving that effect so we are going to upload to images and one is the static image which is going to be the initial image and the second image is going to be the rollover image so when anyone hovers mouse over that image second image is going to pop up and it's going to replace the first image so this effect could be used in case you want to highlight any faded image.
- How to Change or Shuffle Ad Banners on Page Refresh
- Automatically Change Post Background Color’s on Refresh
- Automatically Change Background Color on Refresh in Blogger
Available link for download

Saturday, April 15, 2017
How to Change Screenshot Format On your Mac OS X
How to Change Screenshot Format On your Mac OS X
The default screenshot format on Mac OS X is PNG format, and most of the users want to have it in other formats, say suppose; JPG, GIF. etc. So, many users convert the shots manually by using any image converter. So, that thing simply takes a lot of more time of users.

Learn-How to Change Screenshot Format on Mac OS X
- First of all, Turn on your Mac and go to LaunchPad from the Dock.
- Now, you need to search for Terminal and Ones it is opened then apply the following commands with respect to your preferred format.
For JPG
defaults write com.apple.screencapture type jpg;killall SystemUIServer
For GIF
defaults write com.apple.screencapture type gif;killall SystemUIServer
For PDF
defaults write com.apple.screencapture type PDF;killall SystemUIServer
For Tiff
defaults write com.apple.screencapture type tiff;killall SystemUIServer
For PNG (Reverting)
defaults write com.apple.screencapture type png;killall SystemUIServer
- This was about changing the format of the screenshots which you capture on your Mac OS X. Now, you can have the screenshots of your favorite format.
Conclusion
Available link for download
Friday, March 31, 2017
How to change skin color using Photoshop photo effect
How to change skin color using Photoshop photo effect
 |
| How to change skin color using Photoshop , photo effect |
Hello my visitor
in this simple and very quick tutorial for Photoshop CS6 or any other version , i will show you how to change the color of the skin using Photoshop .
using just the brush and colors (white , black , gray) the gray color i have not show it in the video but do it the same .
Enjoy watching the video :)
dont forget to like my page FaceBook
Available link for download
Saturday, March 11, 2017
How To Change Facebook Background Theme
How To Change Facebook Background Theme
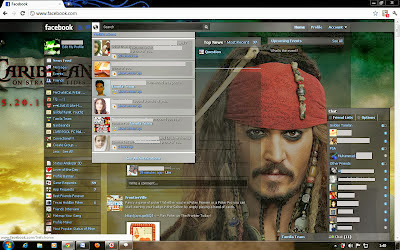
Available link for download
Monday, February 27, 2017
How To Change Complicated Hair Color FILIPINO VERSION Photoshop Richardbelen Tutorial
How To Change Complicated Hair Color FILIPINO VERSION Photoshop Richardbelen Tutorial
TECHNIQUES USED :
1. HUE AND SATURATIONS
2. CURVES
STEPS.
1. DUPLICATE YOUR SUBJECT LAYER
2. SELECT THE COPIED LAYER AND MAKE AN ADJUSTMENT USING HUE AND SATURATION.
3. ADJUST THE COLOR OF THE HAIR BY INCREASING THE BACK PARTS
4. SELECT YOUR HUE AND SATURATION ADJUSTMENT AND CREATE A LAYER MASK
5. BRUSH UP YOUR MASK ACCORDING TO YOUR DESIRED RESULTS.
DONE !
Available link for download
Wednesday, February 8, 2017
How to change Yellow teeth to white teeth
How to change Yellow teeth to white teeth
 |
How to change Yellow teeth to white teeth |
Hello
in this tuto you will learn how to make a yellow teeth look like a white teeth , the tutorial is very simple and the time of tuto is 1:30 minutes , so very quickly
Enjoy watching my video :)
dont forget to like my page FaceBook
Available link for download
Thursday, January 19, 2017
How to Change the Display Screens DPI PPI Settings in Ubuntu
How to Change the Display Screens DPI PPI Settings in Ubuntu
DPI or dots per inch also stands for the tern pixels per inch. As the names suggest, its measure of how close your monitors pixels are to one another. When comparing with the recent Windows 7 operating system thats optimized for 100 DPI display screens... GNU/Linux still uses the 95 DPI (is also the Windows Vistas default settings) and there might be occasions that this could come in handy.
Why this is important?
As said, not everyone gonna need it. But since most of the never Netbooks or display screens in general have very sharp DPI settings (because those pixels are fixed into a smaller screen size) thus things may look a little too small and if youve been used to seen big text and windows "thanks" to your previous old computer... then you can certainly try changing the DPI in Ubuntu (or any other OS in that instance) to try to make things look a bit bigger.
Accessing DPI settings in Ubuntu (or in Gnome classic desktop to be more accurate) is fairly simple. And Im pretty sure almost all the Ubuntu (or Gnome geeks) know this... but if youre a bit new to Ubuntu and wondering ... then this is how you do it.
1. Just right click on your desktop and choose "Change Desktop Background".
2. Then click on the "Fonts" tab and under the sub heading "Rendering" click the "Details" button which should open-up a window similar to the below one.

3. By default Ubuntu or the Gnome classic desktop is optimized for the 96 pixels per inch but you can lower or increase the value to make things look more smaller or bigger.
But remember. the best possible (meaning sharp and clear windows, buttons, etc) setting for your OS is the default DPI that it comes with. And if you go below or beyond this "default" value that its optimized for... then things may not look that sharp. But you can try lowering these values here and there ... you know experiment a little.
You can also use this window to optimized font rendering settings to enhance their readability as well.
 |
| Remember the "magic number" ;-)... |
Available link for download
Friday, January 13, 2017
How to change the default directory of windows explorer
How to change the default directory of windows explorer
 When you open Windows Explorer (by choosing the Window key and "E" simultaneously or by choosing Start, all Programs, Accessories, Windows Explorer), you can change the directory that appears by default. If you choose Start, all Programs, Accessories, and then right-click on Windows Explorer and choose Properties, you can modify the "Target" directory. To go to your C: drive, type simply C: in the Target box and choose OK. You can also enter a shortcut key on this screen, telling Windows the character or combination of characters you want to type to automatically open Windows Explorer. You can even change the icon or specify that you always want Explorer to open up in full-screen mode.
Available link for download
Wednesday, December 7, 2016
How to Change Folder Icon in Windows 7
How to Change Folder Icon in Windows 7
How to Change Folder Icon in Windows 7
Available link for download
Thursday, October 20, 2016
How to change the Default Operating System to start in Windows 7
How to change the Default Operating System to start in Windows 7


Available link for download
Wednesday, October 5, 2016
How To Change Picture Background using Adobe Photoshop 7 0
How To Change Picture Background using Adobe Photoshop 7 0


I was wondering that how can we change the background of a picture if a person in standing in a place then how can we let it standing on another place. Finally I have done the work using Magnetic Lasso Tool.
Steps are listed below:
- Open the image in Adobe Photoshop using open dialog box

- Now right click on lasso tool and click on magnetic lasso tool.

- Then move the tool on the person’s body outline.

- Now press enter then it will look like this

- Right click and click on layer via copy

- On the layer menu click on new then layer or press Shift+Ctrl+N.


- Now open the new background image in Photoshop.

- Now select all the image by pressing Ctrl+A and copy using Ctrl+C.

- Now paste it on the original image using Ctrl+P.

- Now delete the layer named “Background”

- Change the order of the two layers Layer 1 and layer 2.

- Now change the size of layer 2 using Ctrl+T.


- You are done as shown in figure.
 FAARSAL
Available link for download