Showing posts with label linux. Show all posts

Thursday, April 27, 2017

How To Install Wordpress in Linux server

How To Install Wordpress in Linux server


Hello friends In this session i am going to tell you how to install Worldpress in Linux server, Wordpress is open source blogging tool and CMS based on PHP and mysql which runs on a web hosting service. Wordpress is use by more then 18.9% of the top 10 million website.

In order to install wp we have to configure the web server & mysql server.


So now i am going to configure mysql database,

wordpress installation

As you can see sql database has been configured successfully and time to download Wordpress and configure the same, I already downloaded wordpress zip file,

wordpress installation in linux


Ok guys we successfully configured the wordpress config file and added the our mysql database, user and password, all configuration done now time to move and install wordpress

Go to you browser and type http://localhost (i did not configure dns server so i put localhost if you already install dns server then type you website name ) and fill required information

After filling the same click to install

wp installation

Bingo :) wordpress installed successfully :P. Now time to login...

wp installation


Here we go :D 


wp installation

I hope you like my tutorial if yes please share with others, if you have any doubt or quire feel free to ask me


Available link for download

Read more »

Thursday, March 9, 2017

How to Install ATI AMD Catalyst 11 7 Linux Driver in Ubuntu 11 04 Natty Narwhal

How to Install ATI AMD Catalyst 11 7 Linux Driver in Ubuntu 11 04 Natty Narwhal


For both ATI and Nvidia GPU devices in GNU/Linux you should have installed the proprietary drivers if you want to get the full throttle out of your awesome VGA card :D. For instance, with the recent netbooks related AMD Fusion chip-sets where we have both a CPU and the GPU at the same "core" (same physical chip), if you havent installed the proprietary driver then the GPU will not be able to play HD videos nor 3D games and rendering in general in full throttle :/.

So although the idea of "proprietary" is not compatible with the GNU license but thats how the world is anyway, you can either chose to swim with it or against.. (what the heck am I talking, sorry about that).

Anyhow, few days ago ATI (now owned by AMD) released the latest version of their Catalyst driver for GNU/Linux: the 11.7!.

Unlike with many other releases the 11.7 version does bring few major features or changes in general such as...

Im not supposed to be doing this but but... :)
*. Kernel 3.0 x support.

*. VLC player 1.1.9 related hardware acceleration bug fixed.  

*. PowerXpress support for GNU/Linux (finally) - This technology makes it easy to switch between discrete graphics and dedicated graphics (say when you use your Netbook on AC power) which delivers better performs or low performance and enhanced battery life.

*. Few Catalyst control center related bug fixes.

*. De-noise and few other video playback related performance related bug fixes... are just a few to mention.

You can install the ATI/AMD Catalyst 11.7 driver in Ubuntu 11.04 Natty Narwhal by using the below procedure (for 10.10 and 10.04 users please read from the official AMD Wiki pages, here and here). 

*. If have you installed any previous proprietary drivers such as the 11.6 series for instance, then you must remove them before proceeding!.

Now Im not going to do a lot of "explaining" because I feel like Id easily make some of you guys confused.. So basically just enter the below command in your Terminal window (Again remember, these steps are only for those of you who have installed an older version of Catalyst drivers).
sudo sh /usr/share/ati/fglrx-uninstall.sh

If you get an error saying that such command does not exists, etc then use the below one instead.
sudo apt-get remove --purge fglrx fglrx_* fglrx-amdcccle* fglrx-dev* xorg-driver-fglrx

Now lets begin the actual installation procedure.


1. Now first download the actual driver wizard (it contains both 32-bit and 64-bit versions integrated) and make it executable. For that enter the below commands.
cd ~/; mkdir catalyst11.7; cd catalyst11.7/

wget http://www2.ati.com/drivers/linux/ati-driver-installer-11-7-x86.x86_64.run

chmod +x ati-driver-installer-11-7-x86.x86_64.run

2. Now use the below commands to install it.
sudo -s

./ati-driver-installer-11-7-x86.x86_64.run

Just follow your on-screen instructions (the installer is pretty much automatic) and within few minutes you should have installed the AMD/ATI Catalyst 11.7 in Ubuntu 11.04 Natty Narwhal.

3. Optional Step - 

Most people might not need this, but if you found that the graphics are actually worse looking or the ATI driver is not loaded into the Ubuntu then you might want to update a configuration file called "xorg.conf". As said youd probably wont need to do this, but if you need then open enter the below command in your Terminal.
sudo aticonfig --initial -f

Thats it. Now youre done!.


Below method is not necessary by any mens and its only for those of you who wants to manually build ".deb" packages only.  

Need a pre-build ".deb" file?

You can create a ".deb" file if you want. It can be quite handy if you want re-install the driver after a fresh install of Ubuntu where you dont have to re-download some of the required packages to build the driver and install. So...
 
If youd like you can make that ".deb" package of the installer first and then install it too. To do that skip the step "2" and enter the below commands instead (and might want to use that step "3" command too).

First we gotta get the pre-requisite packages.


A. Get the pre-requisite packages - Although this may not be necessary for some since youd probably have them installed automatically installing other apps as dependencies but do it just in case. Open your Terminal window and enter the below command.
sudo apt-get install build-essential cdbs fakeroot dh-make debhelper debconf libstdc++6 dkms libqtgui4 wget execstack libelfg0 dh-modaliases
B. If you use the 64-bit Ubuntu Linux version then make sure to install the below packages too (only for the 64-bit geeks).
sudo apt-get install ia32-libs

C. Now lets build the ".deb" file. For that use the below command.
sudo sh ./ati-driver-installer-11-7-x86.x86_64.run --buildpkg Ubuntu/natty

D. Now install it by using the below command.
sudo dpkg -i fglrx*.deb

Yep thats it. Im sorry that the article looks a bit longer. Enjoy!.


Available link for download

Read more »

Monday, February 13, 2017

Google Earth Offline Installer Latest Version Free Download v7 1 5 or later for Windows Mac and Linux

Google Earth Offline Installer Latest Version Free Download v7 1 5 or later for Windows Mac and Linux


Google Earth Offline Installer free Latest for Windows, Mac, and Linux :

Google earth offline installer latest version v7.1.5.1557 has been released and available to free download. If you are searching for the most recent released file of google earth then it is the right platform for you where you can download google earth latest version offline installer totally free for windows, mac, and linux. Google earth is used for the geo location to visit various places where you will have not gone before. You can set a plan through google earth about the visiting place to go there. To do so you are to download google earth offline installer standalone file from here and then install it on your pc. After successful installation you can use it anywhere any time because it free for every user in all over the world.

About Google Earth:

  • License :     Freeware
  • Publisher :  Google
Required Systems:

  • Windows OS    :  Windows XP, Vista, 7, 8
  • MAC                :   Mac OS X 10.6.0 or later
  • Linux                :  LSB 4.0 standard base


Google Earth Offline Installer free Latest for Windows, Mac, and Linux

To start download of google earth offline installer latest version go below and click on the given downloading link which has been given at the bottom of this article. When you will click on the given downloading link you will have a small windows which will guide you about the downloading file.
Download


Available link for download

Read more »

Saturday, February 11, 2017

How to Install Xarchiver archive manager in Ubuntu Linux

How to Install Xarchiver archive manager in Ubuntu Linux


By default Ubuntu uses the File-Roller as the main archive manager (an original Gnome application). Its quite good actually but being a Gnome app, for the good or the worse it integrates the Gnomes simplicity (yikes) thus it wont let you change some options such as the default temporary folder location and creating a self extracting archive for instance.

Anyhow, if youre a bit frustrated with it and looking for something else that has the capacity to act as a powerful and fast loading archive management utility, then you should try the one called Xarchiver.

Xarchiver is basically a GUI front-end that uses a lot of built in command-line tools which are built into the GNU/Linux operating system to handle archives + is already the default archive management tool used by LXDE and Xfce desktops too.

It has a pretty simple (bit similar to the File-roller actually) interface and lets you do things like...


*. Add/Rename/Delete or Create an archive (containing emails, text files, etc) from scratch. 

*. Save an archive into a different format.

*. Add or remove passwords.


*. Test for extraction errors.

*. Supports a huge list of file formats such as - 7z, ARJ, bzip2, gzip, LHA, lzma, lzop, RAR, RPM, DEB, tar, and ZIP.

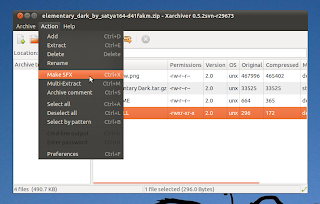
*. As said it also has the ability to let you create self extracting compressed files which is very handy since you can decompress those files without having to have installed an archive manager.

*. Add a comment (another features that File-roller doesnt have).

*. Show the command-line out put (handy while trying to figure out if you had an issue while extracting).


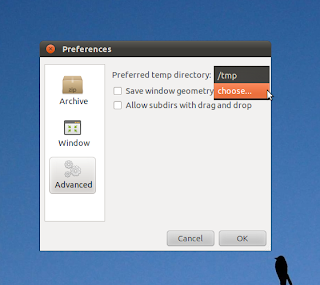
*. A separate "preferences" window (above screen-shot) that lets you configure things such as - ask for conformation while deleting files, change temporary folder location (very useful if you had a "data-full partition" thus the archive manager most probably be unable to extract the content otherwise), show/hide archive commenting, etc.

You can install the Xarchiver in Ubuntu 11.04 Natty Narwhal, 10.10 and 10.04 by entering the below command in your Terminal window.
sudo apt-get install xarchiver

That should do the trick. Enjoy your new and powerful Xarchiver for creating e-mail archives, out of multimedia files or password protected self extracting ones which makes exchanging archives much more easy and secure + for many more of your other nerdy needs :).


Available link for download
Read more »

Thursday, October 6, 2016

How to Install GNU Emacs in Ubuntu Linux 11 04 10 10 10 04 etc

How to Install GNU Emacs in Ubuntu Linux 11 04 10 10 10 04 etc


GNU Emacs is one of the most "colorful" parts of the GNU/Linux operating system. In fact its actually quite older than the GNU/Linux itself (introduced around 1970s) and the one who invented Emacs is the philosopher and the founding father of the "GNU way of doing things" ... Richard Stallman. 

So what is Emacs anyway?

Emacs is mainly a very powerful real time (meaning that as soon as you make the changes to the text it appears on its window which is the most basic and a must have standard for all modern text editors anyway) text editor.

But basically the reason for its not installed by default even after it having a "such a history" and powerful features as a text editor is because its actually aimed at computer programmers (especially the Emacs Lisp programming fork of the original Lisp) and advanced users rather than the "usual users" (like you and me) + according to the official GNU/Emacs page, at its core lies the GNU Emacs Lisp interpretor "engine".

So its basically a programmers heaven, in a way :).

I aint your "average text editor" mate! :)... (not kidding though)
But thats not to say that you cant use it as an advanced text editor, in fact its actually one of the most powerful ones out there as well. To show you how old it is... its current version is 23!.

Main features...

*. Editing a pure text file to HTML and source-codes such as Ruby, XML and A lot more (+ even has the ability to read PDF and postscript files!).

*. Change font.

*. Change background and foreground colors.


*. Line wrapping (wrapping long lines, etc).

*. Show/Hide text line numbers.

*. Supports almost all human languages and scripts! ("one love ... one heart... lets get together ..." ;-) )

*. Find and replace text.

*. Open and save in different formats.

*. Check for spellings.

*. Use a new or switch to a different buffer (a temporary location on your RAM where the text file is located before saving into the HDD).

*. Compile using the above mentioned Emacs Lisp interpretor, etc.

*. This might sound a bit confusing but it also has a calender of its own!, a calculator, programmable calculator, and also the ability to send/receive e-mails (using other apps, built in support via add-ons), read news, project planner, etc + even has some built in Games too!. 


The reason for this, is because: some programmers spend most of their time "inside" the Emacs app rather than doing any other thing thus Emacs is designed to act as a bit of a separate "environment" of its own + thats also why most of em theyre single :D.

*. Encrypt and Decrypt (chosen text or an entire region, etc).

*. Version control system integration.

*. Execute shell commands. 

*. Debugger ... are just a fraction of its main features to mention!.

So as you can see this is not yours or mines average text editor because the default GUI and its filled without options certainly looks a bit complicated for the usual users. So its certainly more than a text editor. Thats why the desktops have created text editors of their own as well :).

Anyhow, you can install this legendary GNU Emacs in Ubuntu 11.04 Natty Narwhal, 10.10 and 10.04 (including all other Ubuntu versions!) by using the below command in your Terminal window.
sudo apt-get install emacs

Currently it has like 23MB or more in size... so be patient while it installs. Enjoy! (or you many not this time :D).


Available link for download
Read more »