Saturday, February 4, 2017
Google Map notification message Please enable a My Location source in system settings
Google Map notification message Please enable a My Location source in system settings

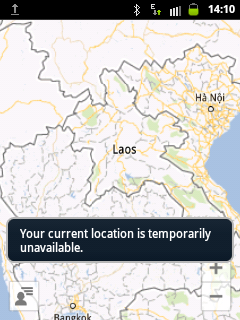
If you open your Google Map
and you are trying to tap the My Location.
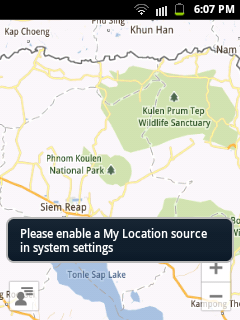
But then, you are seeing this information.
Please enable a My Location source in system settings.
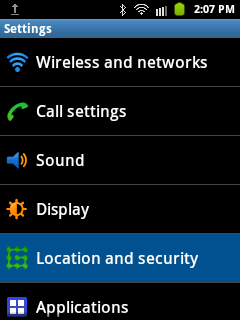
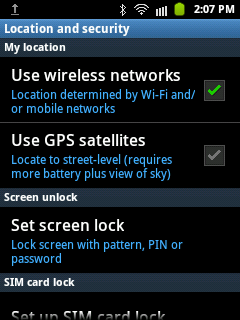
tap the Location and security
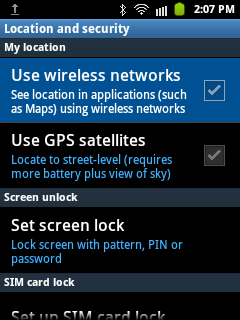
tap the Use wireless networks
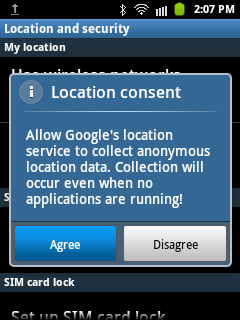
and last, tap the Agree.
if you dont have a WiFi connection,
you cant still see your My Location
and you will see this notification
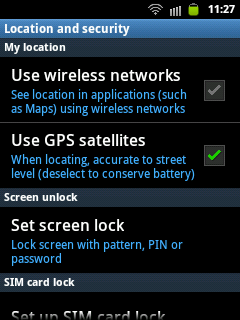
another option you can use is your GPS
check the Use GPS satellites
Available link for download
Thursday, January 19, 2017
How to Change the Display Screens DPI PPI Settings in Ubuntu
How to Change the Display Screens DPI PPI Settings in Ubuntu
DPI or dots per inch also stands for the tern pixels per inch. As the names suggest, its measure of how close your monitors pixels are to one another. When comparing with the recent Windows 7 operating system thats optimized for 100 DPI display screens... GNU/Linux still uses the 95 DPI (is also the Windows Vistas default settings) and there might be occasions that this could come in handy.
Why this is important?
As said, not everyone gonna need it. But since most of the never Netbooks or display screens in general have very sharp DPI settings (because those pixels are fixed into a smaller screen size) thus things may look a little too small and if youve been used to seen big text and windows "thanks" to your previous old computer... then you can certainly try changing the DPI in Ubuntu (or any other OS in that instance) to try to make things look a bit bigger.
Accessing DPI settings in Ubuntu (or in Gnome classic desktop to be more accurate) is fairly simple. And Im pretty sure almost all the Ubuntu (or Gnome geeks) know this... but if youre a bit new to Ubuntu and wondering ... then this is how you do it.
1. Just right click on your desktop and choose "Change Desktop Background".
2. Then click on the "Fonts" tab and under the sub heading "Rendering" click the "Details" button which should open-up a window similar to the below one.

3. By default Ubuntu or the Gnome classic desktop is optimized for the 96 pixels per inch but you can lower or increase the value to make things look more smaller or bigger.
But remember. the best possible (meaning sharp and clear windows, buttons, etc) setting for your OS is the default DPI that it comes with. And if you go below or beyond this "default" value that its optimized for... then things may not look that sharp. But you can try lowering these values here and there ... you know experiment a little.
You can also use this window to optimized font rendering settings to enhance their readability as well.
 |
| Remember the "magic number" ;-)... |
Available link for download
Wednesday, November 30, 2016
How to Edit Compiz Settings in Ubuntu 11 10 Oneiric Ocelot
How to Edit Compiz Settings in Ubuntu 11 10 Oneiric Ocelot
Compiz is an advanced 3D Graphics rendering manager + is one of the first to add the 3D compositing feature to the X-Windows GUI library. After sometime a bit of a rival came called Berryl (a fork of Compiz) but later it was merged back into it thus Compiz the current dominator. But that could change since Gnome Shell uses a one of its own 3D render called Mutter.
Anyhow, you can find a decent amount of GUI tools to edit Compiz settings but for some reason most of the GUI tool can drag you into a bit of a unstable system. And I think the reason is that when you change a setting or two using them, those 1 or 2 settings applies some certain amount of "child" settings inside them which means a lot of changes concerning the 3D rendering engine which leads to the unstable OS, perhaps.
Ubuntu Linux made some serious adaptations of Compiz with the introduction of their Unity desktop module and as almost all knows it has two versions.
Unity 3D: The default version which uses the 3D rendering by default to create a beautiful looking windows, resizing or minimizing effects, etc.
 |
| Compiz is useful, somewhat :)... |
Anyhow, the thing is, with Ubuntu 11.04 it was pretty easy to edit advanced settings of Compiz thanks to the Gconf-editor. But since Ubuntu 11.10 uses a lot of Gnome 3/Shell apps + Gnome Shell is migrating from Gconf-editor (a Gnome desktop configuration database editor GUI) to a new tool called Dconf-editor...
... The problems is that, while I was writing this post, Ubuntu is at its Beta 2 stage and I dont know whether things would change when they release it official (dont think so)... neither "Gconf" nor "Dconf" is installed by default in Ubuntu 11.10!.
Enough talking, lets do it!
1. So if you want to edit Compiz settings then you gotta first install Gconf-editor manually in Ubuntu 11.10 Oneiric Ocelot (Dconf is pretty new still and wont even include any settings concerning Compiz). To do that use the below command.
sudo apt-get install gconf-editor
2. Now, press "Alt" + "F2" keys and put the below command into the search box and hit enter.
gconf-editor
3. This should open a window similar to the below.
 |
| Ahh, the good & "old" friend... |
Anyhow, from your left go to: "apps" -> "compiz-1".
Thats it. Under "compiz-" -> "plugins", youll find all of those "hidden" Compiz OpenGL 3D rendering settings such as: animation, blur, composite, cube effects, decor, ezoom, etc.
 |
| Theyre all there! ... |
gconftool-2 --recursive-unset /apps/compiz-1And if you want to load the desktop with Unitys default settings (user profiles, launcher preferences, etc) then use the below command for that.
unity --resetYou can also use the below command which gives a short introduction to "Unity-Shell", etc (the command-line manual actually).
man unity
Also remember, since OpenGL 3D graphics rendering means deeper hardware integration thus always make sure that you have the up-to-date GPU drivers installed to get the best out of your system. Good luck.
Available link for download