Monday, April 17, 2017
How to Install GVIM a powerful text editor in Ubuntu 11 04 Natty Narwhal 10 10 and 10 04
How to Install GVIM a powerful text editor in Ubuntu 11 04 Natty Narwhal 10 10 and 10 04
GVIM is the graphical "implementation" of the command-line text editor (an IDE actually) called the Vim. Although may not certainly be as "connected" as with the GNU EMacs, but Vim text editor also has a quite long history with GNU/Linux thus it comes pre-installed by default in almost all the GNU/Linux distributions.
But for the obvious reason of not having a GUI, Vim (which is also based on another editor called "Vi") is not that popular among the typical GNU/Linux users but other advanced boys and gals such as system administrators still use it quite often since it allows us to edit any text (+ editing programming language code files) file without having to log-into a graphical user interface to this day nonetheless.
In short, it a GUI written using the GTK+ tool-kit (aimed at Gnome desktop, but you can use it in any desktop you want), but since it uses the Vim as the "engine", youll be getting almost all of its features in a very user-friendly graphical environment!.
Main features...

*. Change font (size, bold, italic, etc).
*. Find and replace.

*. Undo/Redo.
*. Automatic spell checking.
*. Open multiple windows by splitting the window by horizontal or vertically.
*. A "file explorer" of its own which lets you locate and load files to the window for editing.
 |
| The "command-line" type, file explorer to the left... |
*. Text wrap.
*. Send to print... are among the features that interests the standard users.
As mentioned, Vim is actually a programmer friendly text editor, thus GVIM also lets you do other things like Syntax editing, set compilers, "Make" files (compiling), etc which are again, not that useful for the usual users.
You can install GVIM in Ubuntu 11.04 Natty Narwhal, 10.10 and 10.04 by using the below command in your Terminal window.
sudo apt-get install vim-gtk
But, just like with GNU/Emacs, this is not for everyone. For instance, if you enter its settings window, then almost all the settings are activated using commands! rather than graphical tools.
But still, if you usually deal with a lot of Syntax editing or HTML/XML editing... then GVIM is a fast and feature-rich front-end to the original Vim "engine" nonetheless.
But as a final verdict, in my humble opinion, if youre looking for something to replace the Gedit type text editor for instance, then you should have a look at something like the Leafpad or Mousepad or even the awesome FocusWriter will certainly suite rather than the GVIM.
Available link for download

Sunday, April 16, 2017
How to Install Sysinfo in Ubuntu 11 04 Natty Narwhal 10 10 and 10 04
How to Install Sysinfo in Ubuntu 11 04 Natty Narwhal 10 10 and 10 04
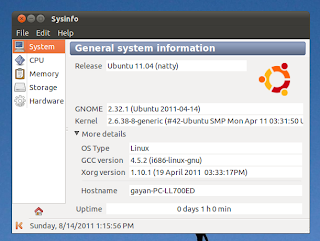
Although Ive already talked about a PC hardware information "gatherer" for GNU/Linux called Hardinfo which is pretty darn good btw. But for one main reason I quite liked another one called Sysinfo because of its simplicity and well designed "categorized data structure" (didnt know how else to put it :D).
The main GUI of Sysinfo is very minimalistic yet the application itself looks very professional. It has a nice Welcome screen (animated, well, who cares!, but that "approach" a bit rare in GNU/Linux apps, dont ya think? ;-) ) and all the hardware of your PC/Laptop are categorized quite nicely to the left side of the screen too.
Main features...

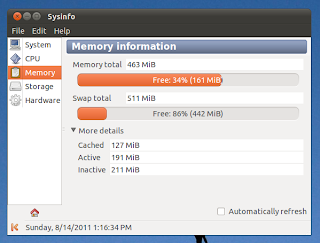
*. Has five (5) basic categories - System, CPU, Memory, Storage and Hardware.
*. Shows a huge list of information related to both your Hardware and software such as the desktop version and its kind (Gnome, KDE, Xfce and LXDE, etc).
*. Memory Usage and Swap space, Cached memory, etc.
*. Under storage youll find all the storage details such as HDD, CD/DVD drives, USB or SCSI drive BIOS versions, vendor, capacities, etc.
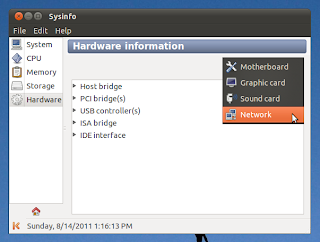
*. If you want more information, then just click on the "Hardware" tab and you can either choose from the drop down menu (as shown in the below screenshot) to filter out certain hardware, etc with ease as well.
You can install Sysinfo in Ubuntu 11.04 Natty Narwhal, 10.10 and 10.04 by using the below command in your Terminal window.
sudo apt-get install sysinfo
After the installation you can run it from: "Applications" -> "System Tools" - "Sysinfo" or just press "Alt" + "F2" keys and enter the below command into the box and press enter.
sysinfoThats it. Hope this was helpful.
Available link for download
Sunday, March 26, 2017
How to Install ClipGrab in Ubuntu 11 04 Natty Narwhal 10 10 and 10 04
How to Install ClipGrab in Ubuntu 11 04 Natty Narwhal 10 10 and 10 04
Although you can download YouTube videos while using a web browser and installing an addon for whatever the one that youre using with ease, but if you usually deal a lot with YouTube and their clip downloads, then wouldnt it be nice to have a dedicated application for that exact purpose?.
If your answer is "Yes", then you should check out ClipGrab. Its written in Qt-toolkit, looks awesome and importantly, lets you search and grab any YouTube videos (and many other similar online video sharing sites!) you want with ease.
Main features...
*. Search for video clips with thumbnail previews.
*. Change save location.

*. Choose the video container format: Original, MPEG4, OGG, WMV (Yikes!), MP3 and Ogg Theora (the official Ogg audio derivative for the video formats).

*. Add audio meta-tags automatically (album, artist, etc).
*. Change between video resolutions (1080p, 720p, 480p, medium or low, etc).
*. Clipboard support: meaning that, whenever you copy or play a YouTube video in your web browser for instance, ClipGrab will be able to automatically fetch that clip and let you download it easily at later.
*. It also supports Vimeo, Dailymotion, MySpass, Clipfish and mare other online video sharing sites.
*. Use proxy servers (you naughty geek! :P).
*. Enable/Disable run in the system tray area.
 |
| Settings window... |
sudo add-apt-repository ppa:clipgrab-team/ppaIf it does not show in your menus... then simply press "Alt" + "F2" keys and enter the below command into the Run box and press "Enter".
sudo apt-get update
sudo apt-get install clipgrab
clipgrab
Available link for download
Friday, March 17, 2017
How to Install Amarok 2 4 3 Berlin in Ubuntu Kubuntu 11 04 Natty Narwhal and 11 10
How to Install Amarok 2 4 3 Berlin in Ubuntu Kubuntu 11 04 Natty Narwhal and 11 10
Amarok is one of the most famous applications/portions of the Qt toolkit written KDE desktop. As promised by the developers with the recently released 2.4.2 beta1 version... it did undergo some GUI and few other major changes which was their preparation for the upcoming 2.4.3 release.
And now the developers have officially announced the availability of the Amarok 2.4.3 "Berlin"!. With this release theyve decided to remove the lower "status-bar" and from now on notifications will be using that "space" which could be cool (or maybe not).
Main features...
*. Few more dynamic playlist related enhancements that were triggered in the 2.4.2 beta version such as Quiz-play bias and a new podcast integration with the Gpodder aggregator, etc.
*. Now you can use drag-n-drop to copy/move your local music collections (including inside the playlists) which was again introduced with the recent beta version but it seems that the playlist in general has been "cleaned" here and there so much more easy to understand (in their own words).
 |
| This is actually a true screenshot of 2.4.3 (too from the official site) but its a damn shame that theyve used MS Windows 7 for the screenshot rather than using GNU/Linux. So I cropped out the borders *put the angry dude here*. Man this attitude of KDE just pisses me off sometimes!... |
*. Thanks to a bug-fix now Amarok geeks :) can configure individual podcast episode names.
*. Automatic scrolling in Lyrics applet.
*. The ability to scrobble the composer as artist to Last.fm + a lot of bug fixes (such as CD ripping related, last.fm, dynamic playlists, etc) as usual.
We can install Amarok 2.4.3 "Berlin" in Ubuntu 11.04 Natty Narwhal by using the Kubuntu teams back-ports PPA, but heres the thing.
The team havent come up with the 2.4.3 version since its so new and only released it like few hours ago. But perhaps when you read this it maybe available. If it is available then you can install it by using the below commands.
Update: Thanks to "jepong" (see below comments) theres actually a PPA that exists created by Philip Johnson and using the we can finally install this "thing" ;-). I have replaced the original commands with this new PPA but if you want to try the official Kubuntu back-ports (they still havent come up with it yet) then just replace the text in "Green" with the below one.
kubuntu-ppa/backports
For Ubuntu 11.04 Natty Narwhal users...
sudo add-apt-repository ppa:philip5/kubuntu-backports
sudo apt-get update
sudo apt-get install amarok
For Kubuntu 11.04 users use the below command instead.
sudo add-apt-repository ppa:philip5/kubuntu-backports
sudo apt-get update
sudo apt-get upgrade
But luckily for the Ubuntu (Kubuntu included) 11.10 Oneiric Ocelot users it seems that Amarok 2.4.3 is already in the repositories!, for the obvious reason of were like few hours away from the official Ubuntu 11.10 Alpha 3 release. So itll be included in the Alpha 3 ISO image it seems.
Anyhow, if you dont daily update the existing 11.10 Alpha version then you should be able to manually install the latest version by using the below command.
sudo apt-get install amarokAs for the 11.04 users, a little patience goes a long way. I know its hard but but... :).
Available link for download
Thursday, March 16, 2017
How to Install GPicView in Ubuntu 11 04 Natty Narwhal 10 10 and 10 04
How to Install GPicView in Ubuntu 11 04 Natty Narwhal 10 10 and 10 04
GPicView in the default image viewer for the lightweight LXDE desktop. Remember, this is certainly not a replacement for other advanced photo management apps such as Shotwell, Picasa, etc in fact as mentioned before, GPicView is just a simple image viewer rather than a "manager" at all.
It has a highly simplified GUI (a lot closer to the one that used to come with MS Windows XP) and loads fast as a result. Other than viewing images it can let you do things like...
*. View in full screen.
*. Rotate clockwise and counter clockwise.

*. Flip horizontally/vertically.
*. Save in a different formats.
*. Delete images from the window... and a separate "preferences" window that lets you configure few things such as - changing the background color of the app itself and few conformation dialogs, etc.

And on the negative side it cannot let you crop or change color settings as with Geeqie, F-Spot or gthumb for instance either. Anyhow...
You can install GPicView in Ubuntu 11.04 Natty Narwhal, 10.10 and 10.04 easily since its in the official Ubuntu software repositories by using the below command.
sudo apt-get install gpicview
Enjoy! (man, I gotta replace this "usual ending word", any suggestions ?? ;-) ).
Available link for download
Thursday, March 9, 2017
How to Install ATI AMD Catalyst 11 7 Linux Driver in Ubuntu 11 04 Natty Narwhal
How to Install ATI AMD Catalyst 11 7 Linux Driver in Ubuntu 11 04 Natty Narwhal
For both ATI and Nvidia GPU devices in GNU/Linux you should have installed the proprietary drivers if you want to get the full throttle out of your awesome VGA card :D. For instance, with the recent netbooks related AMD Fusion chip-sets where we have both a CPU and the GPU at the same "core" (same physical chip), if you havent installed the proprietary driver then the GPU will not be able to play HD videos nor 3D games and rendering in general in full throttle :/.
So although the idea of "proprietary" is not compatible with the GNU license but thats how the world is anyway, you can either chose to swim with it or against.. (what the heck am I talking, sorry about that).
Anyhow, few days ago ATI (now owned by AMD) released the latest version of their Catalyst driver for GNU/Linux: the 11.7!.
Unlike with many other releases the 11.7 version does bring few major features or changes in general such as...
 |
| Im not supposed to be doing this but but... :) |
*. VLC player 1.1.9 related hardware acceleration bug fixed.
*. PowerXpress support for GNU/Linux (finally) - This technology makes it easy to switch between discrete graphics and dedicated graphics (say when you use your Netbook on AC power) which delivers better performs or low performance and enhanced battery life.
*. Few Catalyst control center related bug fixes.
*. De-noise and few other video playback related performance related bug fixes... are just a few to mention.
You can install the ATI/AMD Catalyst 11.7 driver in Ubuntu 11.04 Natty Narwhal by using the below procedure (for 10.10 and 10.04 users please read from the official AMD Wiki pages, here and here).
*. If have you installed any previous proprietary drivers such as the 11.6 series for instance, then you must remove them before proceeding!.
Now Im not going to do a lot of "explaining" because I feel like Id easily make some of you guys confused.. So basically just enter the below command in your Terminal window (Again remember, these steps are only for those of you who have installed an older version of Catalyst drivers).
sudo sh /usr/share/ati/fglrx-uninstall.sh
If you get an error saying that such command does not exists, etc then use the below one instead.
sudo apt-get remove --purge fglrx fglrx_* fglrx-amdcccle* fglrx-dev* xorg-driver-fglrx
Now lets begin the actual installation procedure.
1. Now first download the actual driver wizard (it contains both 32-bit and 64-bit versions integrated) and make it executable. For that enter the below commands.
cd ~/; mkdir catalyst11.7; cd catalyst11.7/
wget http://www2.ati.com/drivers/linux/ati-driver-installer-11-7-x86.x86_64.run
chmod +x ati-driver-installer-11-7-x86.x86_64.run
2. Now use the below commands to install it.
sudo -s
./ati-driver-installer-11-7-x86.x86_64.run
Just follow your on-screen instructions (the installer is pretty much automatic) and within few minutes you should have installed the AMD/ATI Catalyst 11.7 in Ubuntu 11.04 Natty Narwhal.
3. Optional Step -
Most people might not need this, but if you found that the graphics are actually worse looking or the ATI driver is not loaded into the Ubuntu then you might want to update a configuration file called "xorg.conf". As said youd probably wont need to do this, but if you need then open enter the below command in your Terminal.
sudo aticonfig --initial -f
Thats it. Now youre done!.
Below method is not necessary by any mens and its only for those of you who wants to manually build ".deb" packages only.
Need a pre-build ".deb" file?
You can create a ".deb" file if you want. It can be quite handy if you want re-install the driver after a fresh install of Ubuntu where you dont have to re-download some of the required packages to build the driver and install. So...
If youd like you can make that ".deb" package of the installer first and then install it too. To do that skip the step "2" and enter the below commands instead (and might want to use that step "3" command too).
First we gotta get the pre-requisite packages.
A. Get the pre-requisite packages - Although this may not be necessary for some since youd probably have them installed automatically installing other apps as dependencies but do it just in case. Open your Terminal window and enter the below command.
sudo apt-get install build-essential cdbs fakeroot dh-make debhelper debconf libstdc++6 dkms libqtgui4 wget execstack libelfg0 dh-modaliasesB. If you use the 64-bit Ubuntu Linux version then make sure to install the below packages too (only for the 64-bit geeks).
sudo apt-get install ia32-libs
C. Now lets build the ".deb" file. For that use the below command.
sudo sh ./ati-driver-installer-11-7-x86.x86_64.run --buildpkg Ubuntu/natty
D. Now install it by using the below command.
sudo dpkg -i fglrx*.deb
Yep thats it. Im sorry that the article looks a bit longer. Enjoy!.
Available link for download
Wednesday, March 1, 2017
How to Install LightDM in Ubuntu 11 04 Natty Narwhal
How to Install LightDM in Ubuntu 11 04 Natty Narwhal
Canonical said that if they get rid of GDM (gnome display manager) and install something a bit "light-weight" would certainly help to speed up the booting times in Ubuntu Linux. First I thought "ya, like its gonna make a difference" but it turns out to be that I was quite wrong (damn it!).
Starting with the Ubuntu 11.10 alpha releases, Canonical did replace GDM with another lightweight log-in manager called LightDM and according to some testers, LgihtDM has actually being able to cut out few seconds of booting times in Ubuntu thus significantly speeding things up!. Although LightDM is certainly not the only reason for this sudden "boost" but it has certainly helped, it seems.
So I thought giving it a go in my Ubuntu 11.04 Natty Narwhal Laptop and how did it went?, well, not so good.
But to remind you that both lightDM and Ubuntu "integration" is at the beta stage at this moment thus bugs and compatible issues will have to be tolerated and even if you successfully installed LightDM in Ubuntu 11.04 Natty Narwhal there are no guaranteed results.
 |
| The "beauty" lightdm!... |
So if at this moment you should not try to install this if you want the best possible stability out of your current Ubuntu OS. Anyhow, I dunno whether its for the good or the worse :P but before installing and replacing GDM with LightDM and later realizing that it doesnt work at all thus all of a sudden you have an Ubuntu OS thats stuck at the log-in screen... there is actually a way that we can "test" LightDM, like running it in a Virtual environment before actually replacing the GDM.
So lets begin the installation.
There is a PPA available for this, so the installation is pretty straight forward. Just open your Terminal and enter the below commands.
sudo apt-add-repository ppa:lightdm-team/ppaNow to the near end of the installation youll be asked by a window that says to choose either "gdm" (the current one) or the "lightdm". Dont choose lightdm, yet. Make sure youve selected "gdm" (just for now :D) and press enter.
sudo apt-get update
sudo apt-get install lightdm lightdm-greeter-example-gtk
 |
| Just make sure youve chosen "gdm", just for now :)... |
How to test it?
I actually grab most of these information from this Ubuntu Wiki page (it kinda destroyed my perception of being an "expert" didnt it?, shi*) and it says that to test lightdm before applying it, to use the below command.
lightdm --test-modeBut my 11.04 Natty gave me an error saying that an Xserver module called "Xephyr" is missing. So before "testing" it in the somewhat "virtual" mode, you too might want to install that "Xephyr". To do that, open your Terminal and enter the below commands.
sudo apt-get install xserver-xephyr
Now enter the above command and it should open up a new window and will run lightdm in it. Although you can click on the options such as users, etc on the window (as you were running it for real) but its just a "virtual" environment thus you cant log-in or do anything at all.
But the thing is that, if you see a perfectly running lightdm (with a GTK theme, working menus, without any screen flickers, you know nothing "unusual") then youre good to go.
Even if you dont see a GTK theme but an ugly looking theme, still lightdm will run just fine. But after you put this command if nothing happened or even if it did open a new window and then gave few blinks and just crashed (like in my case, thats why I dont have a screen shot of that window), then thats whats going to happen if we actually replace it with GDM.
Update: According to Craigs comment below, he actually have found out that after installing a GTK-Greeter theme by using the below command should solve this "flickering and crashing" issue.
Although I havent tested it (I removed lightdm ... gonna wait till 11.10 hits the streets) but its worth trying.
sudo apt-get install lightdm-gtk-greeterSo if you see any on those, then please go no further and wait a little longer until they introduce a stable version. But they also update this PPA quite often so youd probably have a much improved version by the time you read this post, hopefully.
But after running it in the "test-mode" if it ran perfectly well for you, then you can safely enable it for real by entering the below command in your terminal window and choosing "lightdm" this time instead of "gdm". Otherwise, as said, its at its beta stage right now, thus we should better wait (not by choice, in my case :/).
sudo dpkg-reconfigure gdmIf however this works really well in your computer (lucky Geek!) then you can install several themes for Lightdm that uses GTK, Webkit or Qt as the "engine" to make thing look much more beautiful as well :D. To install them use the below commands.
sudo apt-get install lightdm-engine-webkit
sudo apt-get install lightdm-engine-gtk
sudo apt-get install lightdm-greeter-example-qt
Good luck!.
Available link for download
Friday, January 27, 2017
How to Install Leafpad Text Editor in Ubuntu 11 04 Natty Narwhal
How to Install Leafpad Text Editor in Ubuntu 11 04 Natty Narwhal
Both Unity and the Gnome classic desktop share the same text editor in Ubuntu Linux 11.04 (oh oh :P) which is called Gedit (the default text editor that comes with Gnome actually). It loads fast and has a lot of options (can even handle some HTML files) thus its a powerful text editor without a doubt.
But if youre looking for something thats much more simpler than that, that which uses less resources, then Leafpad is the one to call for :). Leafpad actually comes as a part of the LXDE desktop (a light weight desktop for GNU/Linux) and in comparison with Gedit or many others, it has very little options (no preference window at all), one of the fast loading ones + uses very little system resources as well.
Main Features...
*. Running more than one instance is supported (new windows), although tabs are not implemented there, yet which would have been nice otherwise.

*. Search and replace words/text.
*. Change font, word-wrap and display lines.
*. Cut/Copy/Delete and Undo/Redo ability.
*. Auto indent.
*. Open and save in few different file formats.
*. Print preview (and send to printing from its window).

*. Drag-n-drog support.
Thats about it. You cant change the background or any other look-n-feel of the text editor but for its purpose its quite good, I guess.
You can install leafpad text editor in Ubuntu 11.04 Natty Narwhal, 10.10 and 10.04 by using the below command in your Terminal window.
sudo apt-get install leafpadBut as said, remember, this cannot fully replace Gedit or Kate (Qt/KDEs text editor) for instance because of the lack of few minor options but that being said, if youre looking for something thats fast like hell and minimal distractions + low on resources, then Leafpad is something worth giving a shot :). Enjoy!.
Available link for download
Friday, November 11, 2016
How to Install elementary Dark GTK Theme in Ubuntu 11 04 Natty Narwhal
How to Install elementary Dark GTK Theme in Ubuntu 11 04 Natty Narwhal
Although a bit inspired (a bit! :D) by Apple, I gotta say that the Elementary team do have a talent for creating amazing applications + especially when it comes to art work... they just rock!.
Although they started off as a project that used to give (it still does) a beautiful looking complete theme suite for Ubuntu, but soon they saw their opportunity and seize it :) which is now called the Elementary OS (finally something of their own). As said when looking at what theyve done and the small group of geeks in the team, its bloody amazing what a bunch of people can achieve.
Anyhow, among many of their inventions, the previously introduced Elementary theme was a massive hit within the GNU/Linux community. As said, its clear that theyve taken few ideas from Apple but that theme looks awesome nonetheless!.
Although this may not interest many but have you been looking for a bit darker version of that elementary theme??, well if you were, then youre in for a little treat pal :) because few days ago another a deviantart user called Satya released a darker version of the elementary theme called "elementary Dark!".
Main features...

*. Two buttons instead of the usual "three". Maximize button to the right edge and the close button to the left-edge.
*. Re-customized breadcrumbs for the Nautilus.
*. Panel colors included.
*. This does not work in Unity. I mean it does, partially. For instance, in Unity, after installing, the theme will only change the look-n-feel of Nautilus and other individual apps and wont "touch" the application launcher nor the top panel, etc.
So at the moment it only supports Gnome classic desktop (metacity, GTK2).
 |
| My desktop after installing, Im using the Gnome High-Contrast icons... |
One thing that I noticed after installing it was the lightness of the mouse pointer which means that thanks to the murrine engine, unlike with the default Ubuntu theme (Ambiance, which is also based on murrine) which is a bit slowish, but the elementary dark theme "feels light"!.
Anyhow you can install the elementary dark theme in Ubuntu 11.04 Natty Narwhal, although I havent checked this may also work in Ubuntu 10.10 and 10.04 too.
Although recent version of Ubuntu comes with murrine pre-installed as mentioned before (Ambiance is based on it) but the developers advices to have the latest, most up to date version installed.
1. So to install the latest murrine theme engine in Ubuntu 11.04/10.10 and 10.04 (using the PPA), open your Terminal window and enter the below commands.
sudo add-apt-repository ppa:murrine-daily/ppa
sudo apt-get update
sudo apt-get install gtk2-engines-murrine
2. Now youre ready to go to the next step.
The theme does not have any other dependencies but if you want the best possible integration, then you should have the elementary-mono-dark icon theme installed. To do that simply use the below command.
sudo add-apt-repository ppa:elementaryart/ppa
sudo apt-get update
sudo apt-get install elementary-theme elementary-icon-theme
If you also want the wallpapers... then use the below command as well.
sudo apt-get install elementary-wallpapers
3. Now get the actual theme from here and extract it , say to your desktop. Now open your Terminal and change the directory to your desktop (or where you have it extracted) and enter the below command.
sudo sh ./INSTALL
Now you should have successfully install the elementary dark theme in Ubuntu Linux!. Use your usual procedure to apply it to system-wide.
If you use Fedora, to make a long story short, enter the below command and then jump to the step "3" right away. That should do it for you.
yum install gtk-murrine-engine
However...
 |
| The bit "lighter version"... also looking good :)... |
... if youd prefer a bit more "lighter" version then there is another theme based on this one from the same dude called "elementary dark mod" that you can get from this page. Again, thank you Satya for this pretty cool theme. Enjoy!.
Available link for download
Friday, November 4, 2016
How to Install Deluge bit torrent client in Ubuntu 11 04 Natty Narwhal 10 10 and 10 04
How to Install Deluge bit torrent client in Ubuntu 11 04 Natty Narwhal 10 10 and 10 04
Although Ubuntu Linux 11.04 and other latter versions do come with a bit-torrent client of their own which is called "Transmission" which actually is pretty good in my humble opinion.
But after getting familiar with "torrents" and if youre looking for something that lets you configure a lot more + with a lot of built in features, etc than the Transmission... then Deluge is a pretty darn amazing application!.
Deluge is a cross-platform bit-torrent client that can be used in GNU/Linux, Windows and Mac OSX. The GNU/Linux version comes with a features-rich GUI (written in GTK tookit) and uses Python as the programming language, it seems.
Main features...

*. It has a GUI thats very familiar with many other clients thus youd feel at ease almost immediately.

*. A lower "status" section that shows: uploading/downloading speed, Seeds and Peers, availability, enable/disable downloading selected files within the main torrent file, etc.
*. System Tray support (you know, minimize to tray, etc).
*. Change upload/download speed, pause, stop, resume torrents.

*. Port forwarding facility (a must have if you want to achieve the best possible speeds if you use a router).
*. Enable protocol encryption.
*. Change other various things such as - maximum connections, upload slots, maximum opened connections, etc.

*. Manually edit/add trackers (another thing that can speed things up a bit :D).
*. Excellent plug-ins support: It comes with a decent amount of built in plug-ins that lets you expand a lot of its features (notifications, IP blacklists add-on, etc).
*. Change cache, proxy settings, add files to queue... are just a few to mention.
You can install Deluge in Ubuntu 11.04 Natty Narwhal, 10.10 and 10.04 by using their official PPA channel. For that, as usual, open your Terminal window and enter the below commands.
sudo add-apt-repository ppa:deluge-team/ppaAll right, that should do it... but dont do anything "bad" with it ;-) (kidding).
sudo apt-get update
sudo apt-get install deluge
Available link for download