Sunday, April 23, 2017
How to Enable Show Hidden Files and Folders
How to Enable Show Hidden Files and Folders

(?) Start ??????? Run ??????????????? regedit ???? ?????????????????? Registry Editor ??? ???????????
(?) Registry Editor ?????? ?????????????? ????????? ???????? ????????????????????
HKEY_LOCAL_MACHINESOFTWAREMicrosoftWindowsCurrentVersionExplorer Advanced FolderHiddenSHOWALL
(?) SHOWALL ??? ??????????????????? ?????????????????? CheckedValue ??????? ????????? ??? delete ???????????????(?) ???????? DWORD Value ???????? ??????? ?????????????????? ????????? ???? delete ?????????? ???????????????? Right Click ????????????? New > DWORD Value ??? ??????????????????????
(?) CheckedValue ?? ??????????????????? CheckedValue ??????? Double Click ?????? Value Data ???? 1 ?? ?????????????????????? ???????? ???????? My Computer ??? Tools>Folder Options...??????? Show hidden files and folders ??? ???????????? ?????????????
Available link for download
Friday, April 14, 2017
How to Create PDF files from Microsoft Word
How to Create PDF files from Microsoft Word
Creating PDF files by using the Adobe PDF printer.
After you specify your printing options, you can create a PDF file from the Word document.
To create a PDF file using the Adobe PDF printer:
1. In Word, choose File > Print.
 2. Choose Adobe PDF from the Printer Name pop-up menu. In this example I am using primopdf
 3. Click OK, and specify a filename and location for the PDF file, and then click Save.
 4. Done.
Available link for download
Wednesday, December 14, 2016
How to Convert a VMware VMDK to Hyper V VHD Virtual Server Files
How to Convert a VMware VMDK to Hyper V VHD Virtual Server Files
How to Convert a VMware VMDK to Hyper-V VHD Virtual Server Files
Available link for download
Friday, December 9, 2016
How to Hide Files Inside JPEG GIF PNG Images
How to Hide Files Inside JPEG GIF PNG Images


How to get our Files back from the image?
Available link for download
How to download Flash Files No Flash files in tmp
How to download Flash Files No Flash files in tmp
Firstly, we have our facebook page now, you will find a link to like this page in the right column, please like this page and keep yourself updated about new post(s) on Linux on Desktop.
First a disclaimer,it might be illegal to download flash file,it depends upon the websites TOS and I encourage you to go through them before attempting to download flash file, if it is illegal I will NOT recommend that you download flash file.
There are different ways to download flash file, there are plugins that you can install in firefox, there are scripts that allow you to do so, however,one of the better ways that I have used for years( at least more than a year) is copying FlashXXX files from /tmp and renaming them appropriately.
Whenever flash played any media file in the browser, it downloaded Flash file locally in /tmp and deleted it when you closed the page. This had many advantages, for instance if you find something interesting and have already watched it in browser, you do not have to download it again using some plugin, or for instance you could only play part of file by seeking it appropriately and the relevant section is only downloaded in /tmp.
However, I found after updating my system, I no longer had FlashXXX files stored in /tmp , I looked frantically on net to find out reasons for this and found that this has to do with Adobe Flash Player being updated, which no longer saves Files temporarily in /tmp. I further looked up different forums on the Internet and found Flash indeed saved file on the system locally, it was just bit more difficult to access them.
In this post I would try to demonstrate how to retrieve flash files stored locally in the system while it is being played in the web-browser when they are not saved in /tmp. This works with Mozilla Firefox, I havent tried this with other browsers, though it can work.
One approach to solve this problem would be to downgrade your flash to earlier version, but this is not recommended as updates fix many critical security vulnerabilities and further have performance improvements.
The key to finding flash is the fact that on POSIX based systems, or for instance GNU/Linux all the information about processes running on the system is stored in "/proc" directory were each running process is identified with Process ID and there is a directory corresponding to PID in /proc. Further, all the open File descriptors are maintained here i.e in a lyaman all the information about files opened by process is here.
So if we can find process ID corresponding to the instance of flash player and find the fd corresponding to opened flash file we can easily copy the file and this is the approach that is followed by this script ( I am not the original author of this script) :
Open your favorite text editor and copy the following script, and rename it to something like - findflash.sh
#!/usr/bin/env bashNow, open your favorite flash(ensure it is legal to copy) file in web-browser, and in terminal window execute this file by issuing command :
for flashpid in $(pgrep -f flashplayer.so); do
cd "/proc/$flashpid/fd"
for video in $(file * | grep /tmp/Flash | sed s/(^[0-9]*).*/1/g); do
echo "/proc/$flashpid/fd/$video"
done
done
bash findflash.shThis should print the fd corresponding to all the flash files currently playing, copy them using conventional UNIX command and rename it to meaningful name.
The screen shot below illustrates this -
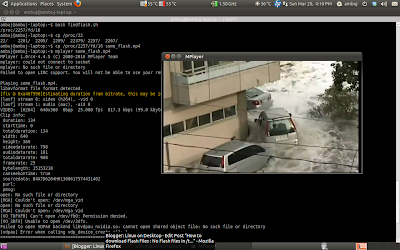 We had opened a video in Firefox, then we executed findflash.sh script, which gave us file descriptors of opened flash video, we copied and renamed this to some meaningful file name and played it using mplayer.
Article Written by : Ambuj Varshney (blogambuj@gmail.com)
For Linux on Desktop Blog , http://linuxondesktop.blogspot.com
(C) 2011 , Ambuj Varshney
Available link for download
Sunday, November 27, 2016
How to Install APK Files on Android Device Emulator
How to Install APK Files on Android Device Emulator
In this tutorial you are to run any APK (Android application) file to your Android emulator. Assuming you already have the Emulator running (if not sure how run the Android device emulator, refer to this http://blog.kerul.net/2011/09/android-emulator-to-run-your-apps.html) .

Locate your adb.exe file in your Android SDK folder. In Windows environment normally your adb.exe is inside [Android-SDK-folder]/platform-tools/ . In my case, the adb.exe is in C:android-junoandroid-sdkplatform-tools (this is an example path to the adb.exe, may varies depending on your system). Find any APK file (for the purpose of this tutorial, I’ve prepare an APK file – download here http://bit.ly/peribahasa-apk ). After you’ve successfully downloaded the APK, put it inside your [Android-SDK-folder]/platform-tools/ as in Figure 2.

Figure 2
Now run the adb.exe through the command prompt, go to Start, and find cmd.

In the command line, go inside the platform-tools folder, as in the Figure 4. Execute command;
adb install Peribahasa.apk
C:Userskerul>cd

C:>cd android-juno

C:android-juno>cd android-sdk

C:android-junoandroid-sdk>cd platform-tools

C:android-junoandroid-sdkplatform-tools>adb install Peribahasa.apk

Later, the apps you just install will be in the emulator.

Available link for download
Saturday, October 22, 2016
how to Lock or encrypt drives to protect your files
how to Lock or encrypt drives to protect your files
Ok now lets begin to ecrypt/lock drives using BITLOCKER
Plugin your Pendrive into your Usb port.
(Skip the above step if you want to lock/encrypt a local drive)
Click on Start button and type Bitlocker and click on BitLocker Drive Encryption
Now you can see all local drives and your pendrive(If you have plugged in any)
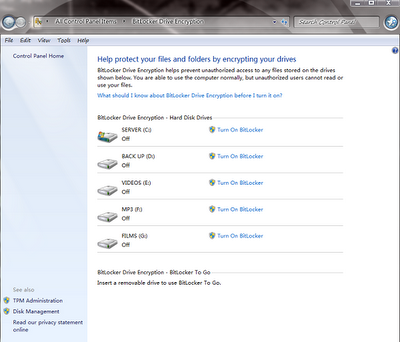
Now click on Turn on BitLocker in front of the drive you want to lock/Encrypt.
Now it will ask you to choose your password
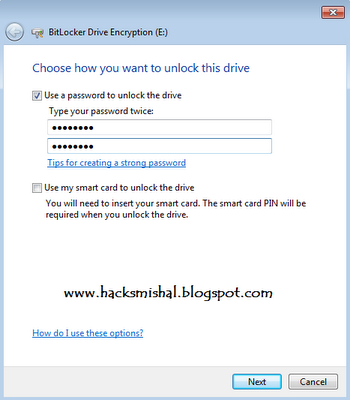
Once you have entered your password click Next you will be now asked to save the password or take a print out.just save it in a safe place and click next

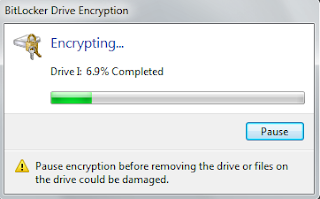
Now bitlocker will start encrypting your drive.The encryption time varies according to the size of the drive.
If you have encrypted/locked a local drive then you will see a lock in front of the drive.
If you have encrypted/locked a pendrive then you will see a bitlocker setup file when you put this pendrive in computer.Install this in another computer.
(If bitlocker is already installed in another system then this step is not required.)
Now it will prompt you to enter your password....and done all your files are safe now.....
Available link for download
Tuesday, October 18, 2016
How to Check the Integrity of the Windows 7 System Files
How to Check the Integrity of the Windows 7 System Files
Windows includes a utility that scans your Windows 7 system for corrupt, changed or missing system files. Normally you run this utility in booting off the DVD into repair mode but running this from the command prompt is much easier.To run this utility , you will need to open a command prompt in administrator mode and follow the steps.

- Go to Start menu.
- Select All Programs and then Accessories
- Right-click on Command Prompt and select Run As Administrator.You can run the service in Command Prompt, by using the following syntax: SFC [/SCANNOW] [/VERIFYONLY] [/SCANFILE=] [/VERIFYFILE=] [/OFFWINDIR= /OFFBOOTDIR=]
- Press Enter

This will scan and attempt to repair any files that are changed or corrupted. You can run that command with sfc /scannow.
Available link for download
Saturday, October 15, 2016
How to Password protect Microsoft Office files
How to Password protect Microsoft Office files
 We all use Microsoft Office to create Word documents,PPT presentations or some other..But there are certain documents that you dont want other people to access specially when you are on a shared computer in your company and you may have your certain secret data stored in your word document that should not be accessed by your boss or other employee’s.To deal with such a situation Microsoft office integrated a security feature in Microsoft office so that you can password protect your files.The procedure is quite simple.In this tutorial I will explain you the step by step procedure with screenshots Of How To Password Protect Microsoft Office 2007 Files
STEPS
1 ) Open the Microsoft Office file that you want to password protect and Click on the Microsoft Office Button present on the top left corner of the window.
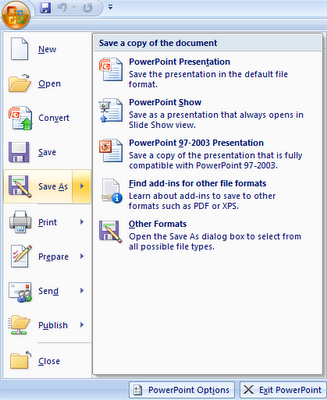
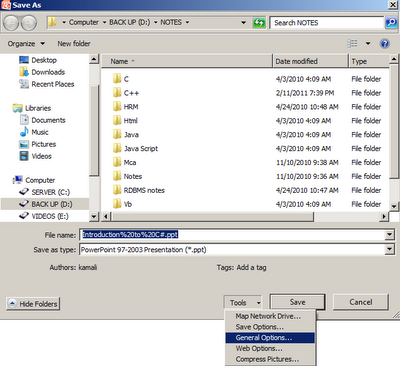
2) Now Click on the Save As option a new window will pop up.Click on Tools option at the bottom of the window. and select general options as shown below
3) Now you will have two options.You can select either one or both options
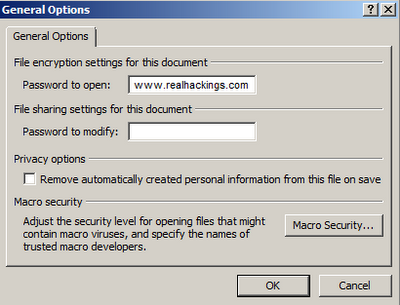
One is Password To Open,it will ask for the password every time the document is opened.So to view the document you have to enter the password first.
Second is Password To Modify,it will ask for the password every time somebody tries to modify the document.
Available link for download