Monday, April 24, 2017
How to organize applications on samsung galaxy phone
How to organize applications on samsung galaxy phone
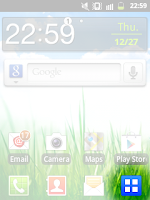
To organize the applications on your phone.
First, tap on the application icon


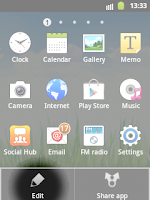
tap Edit
After that, you will see that the apps look like these.
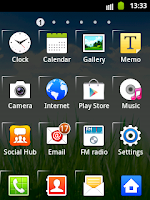
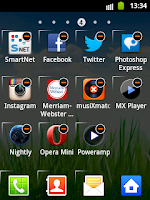
As you can see, some applications have this
 icon at the top right corner.This mean that you can delete that app. However the default applications are those that cant be deleted.
To organize the positions of the applications, tap and hold the app until you felt that the phone vibrate, signaling that you can now move the application at any page/location or position you want.
Available link for download

Saturday, April 22, 2017
How to Activate MyPhone Applications
How to Activate MyPhone Applications
How to activate my|phone features and application such as Java, Google maps, MSN, Yahoo messenger, Gtalk, Skype, Facebook, and Twitter. In this post I will show you the step by step on how to activate my|phone application.
MMS/GPRS Setting GLOBE
Go to Menu=>Services=>WAP=>Settings=> Edit Profile
Select myGlobe WAP, Press Activate Profile and Save
Go to Menu=>Messages=>MMS=>Message Settings=>Server Profile
Select myGlobe MMS, Select Activate Profile and Save
Activate by sending “GPRS ON ” to 2951 but do not save the response from Globe.
If surfing or MMS sending does not work or results in an error, please proceed to the next step for manual setting.
GPRS Settings
GPRS Data Account 3
Account Name: myGlobe MMS
Access Point Name (APN): mms.globe.com.ph
GPRS Data Account 4
Account Name: myGlobe GPRS
Access Point Name (APN): http://www.globe.com.ph
WAP Network Settings
Rename Profile: myGlobe WAP
Homepage: http://www.globe.com.ph/globe.asp
Data Account: myGlobe GPRS
Connection Type: HTTP
Proxy Address: 203.177.042.214
Proxy Port: 8080
MMS Network Settings
Rename Profile: myGlobe MMS
Homepage: http://192.40.100.22:10021/mmsc
Data Account: myGlobe MMS
Connection Type: HTTP
Proxy Address: 203.177.042.214
Proxy Port: 8080
MMS/GPRS Setting SMART
Go to Menu=>Services=>WAP=>Settings=>Edit Profile
Select Smart WAP, Press Activate Profile and Save
Go to Menu=>Messages=>MMS=>Message Settings=>Server Profile
Select Smart MMS, Select Activate Profile and Save
Activate by texting “GPRS ON to 333
If surfing or MMS sending does not work or results in an error, please proceed to the next step for manual setting.
GPRS Settings
GPRS Data Account 1
Account Name:
Access Point Name(APN):
GPRS Data Account 2
Account Name: SMART GPRS
Access Point Name(APN): Internet
Exit and save settings
WAP Network Settings
Rename Profile: Smart WAP
Homepage: http://wap.smart.com.ph
Data Account: Smart GPRS
Connection Type: HTTP
Proxy AddressL: 010.102.061.046
Proxy Port: 8080
MMS Network Settings
Rename Profile: Smart MMS
Homepage: http://10.102.61.238:8002
Data Account: Smart GPRS
Connection Type: HTTP
Proxy Address: 010.102.061.046
Proxy Port: 8080
MMS/GPRS Setting SUN
Go to Menu=>Services=>WAP=>Settings=> Edit Profile
Select Sun WAP, Press Activate Profile and Save
Go to Menu=>Messages=>MMS=>Message Settings=>Server Profile
Select Sun MMS, Select Activate Profile and Save
For corporate accounts, fax a letter of request and ID of the authorized signatory to 395-0138. Approval and activation maybe slightly delayed.
Text “ACTIVATE” and send to 2300
If unable to activate,please call Sun Customer Hotline (200 on your mobile phone).
If surfing or MMS sending does not work or results in an error, please proceed to the next step for manual setting.
GPRS
GPRS Data Account 5
Account Name: Sun MMS
Access Point Name (APN): mms
GPRS Data Account 6
Account Name: Sun GPRS
Access Point Name (APN): wap
WAP Network Settings
Rename Profile: Sun WAP
Homepage: http://wap.suncellular.com.ph
Data Account: Sun GPRS
Connection Type: HTTP
Proxy Address: 202.138.159.078
Proxy Port: 8080
MMS Network Setting
Rename Profile: Sun MMS
Homepage: http://mmscenter.suncellular.com.ph
Data Account: Sun MMS
Connection Type: HTTP
Proxy Address: 202.138.159.078
Proxy Port: 8080
Available link for download
Friday, November 25, 2016
How to Create Portable Versions of Applications Using Cameyo
How to Create Portable Versions of Applications Using Cameyo
Portable applications are useful if you use many different computers. You can take your library of applications with you and use any Windows computer to run them. However, what if there is an application you use that does not come in a portable format?
There are many useful portable applications out there, but there may be some applications you use in your daily work that are not among them. Cameyo is a free portable application creator that creates a single executable (.exe) file from an entire Windows program. Copy this single file to a USB flash drive or external hard drive and you can run the program on any Windows computer without having to install the program.
Download Cameyo to a folder on your hard drive. Cameyo does not need to be installed. The file you download for Cameyo is not an installation file; rather is a portable program itself. Double-click on the .exe file to open Cameyo.
The company that produces Cameyo says that you must create your portable application in a virtual machine. As they say in their Virtual Application Packaging – Best Practice Guide:
“Prepare a clean, basic virtual machine. Make sure no unnecessary programs run on it. Turn off all possible updates, including Windows Updates or anti-virus updates. Avoid using other programs on your machine. In general, anything that can modify files or registry keys, will interfere with the packaging process. We recommend using XP SP3 32-bit, unless your software requires some higher systems to install & function.”
For information on creating a virtual machine see our article on installing Windows 8 in VirtualBox. That will give you an idea on how to install other operating systems in VirtualBox as well.
NOTE: Cameyo creates a portable application by taking a snapshot of your system before the application is installed and again after, capturing the changes to the system. Therefore, make sure the application you want to make into a portable application is NOT installed on your computer before you start this process.
A dialog box displays asking which program you want to open. We’re going to create a portable application, so we select Capture an installation and click OK.
Cameyo displays a dialog box in the lower-left corner of your screen while it takes an initial snapshot before installation.
When Cameyo displays the following dialog box, install the software you want to package as a portable application.
Go through the normal installation procedure for your software.
While initially installing and packaging the application, any settings you modify in the application before ending the capture will be stored within the application. Therefore, once the software is installed, and BEFORE clicking Install done, run the application and configure it how you want. Then, click Install done to finish the capture process.
If you don’t want to change any settings in the application, simply click Install done once the installation if finished.
Cameyo takes a post-installation snapshot.
A dialog box displays once the package was successfully created. Click OK to close the dialog box.
Your portable application should be in C:Users<username>DocumentsCameyo apps. It will have the name of the program with “.cameyo.exe” at the end. Double-click the file to run the program.
If the User Account Control dialog box displays, click Yes to continue.
NOTE: You may not see this dialog box, depending on your User Account Control settings. The User Account Control dialog box displays every time you open the packaged application, depending on your settings.
If you need to register the application, do so when prompted.
NOTE: You will not have to do this again. The information is stored in the portable application.
There are more modules available in Cameyo. To open the main program, double-click the Cameyo.exe file again, select Cameyo on the dialog box, and click OK.
Keep Reading…
If this is the first time you’ve opened the main Cameyo program, you will be asked to register. Registration is free and provides additional features. Fill out the form and click Register.
To see what portable apps are available through Cameyo, click the Computer icon at the bottom of the window. You’ll notice the application you just created. Click it to run it or click the X to delete it.
Click the Studio icon at the bottom of the screen.
Once you have created a packaged, portable application, you can change settings for it. To do this for the application you just created, click the icon next to Package editor.
NOTE: You can also edit a package my selecting Edit a package on the Cameyo dialog box that displays after double-clicking the Cameyo.exe file.
In the Package Editor, click the Open existing virtual app link.
NOTE: If you’ve opened a package for editing previously, it is listed under Recently edited.
Navigate to the Cameyo apps directory, select the portable application you just created and click Open.
There are several options to set on the General tab. Click Advanced for additional options.
On the Advanced tab, you can change additional settings, such as whether the program will leave any traces on the computer.
For additional information on these settings, see the User Guide available on Cameyo’s site.
If you make any changes to the settings, select Save from the File menu to save your changes.
A dialog box displays once the package has been saved. Click OK to close it.
To close the Package Editor, select Exit from the File menu.
There are some general settings for Cameyo that can be adjusted. If you’ve closed the main Cameyo window, open it again (as discussed earlier) and click the wrench icon in the lower-right corner of the window.
Here, you can change the directory into which your portable apps are saved, and set several other options. Click OK once you’ve made your changes.
To close the main Cameyo window, click the X in the upper-right corner of the window.
Cameyo comes with an extensive apps library (using the Library icon in the main Cameyo app), composed of hundreds of the most popular software. This allows you to try out software without having to install it. If you don’t want the app anymore, simply remove it. It will not leave any remnants on your computer.
You can use Cameyo free for home use and for smaller companies and on up to 49 machines.
There are also other methods of transforming install only applications into portable applications.


Available link for download