Sunday, November 13, 2016
How To Cleaning the SamSung ML 1610 Laser Printer
How To Cleaning the SamSung ML 1610 Laser Printer
Laser Printers are getting cheaper. They work well and need very little maintenance except for changing the toner cartridge. At times, there may be a need to clean the lens of the Laser Scanning Unit (LSU). This article tells how to clean this lens which was not covered properly in the Samsung’s printer manuals or servicing guide.
FAQ
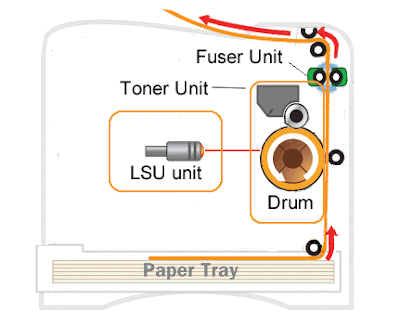
What is this LSU unit?
It is the “printer head” of the printer. Instead of emitting ink, the LSU emits a laser beam, directing it at the drum of the toner cartridge so that electrostatic charge can be transferred onto the paper to form a “temporary glue” to pick up the carbons as the paper passes through the drum.
Why need to clean the unit?
Sometimes, when we move our printer around with toner cartridge still inside, some toner powder could have fallen on to the lens of the LSU. This will weaken the laser beam and prevent electrostatic charge being transferred onto the paper; as a result, the printing either got missing characters or blank vertical lines.
Where is this LSU unit located?
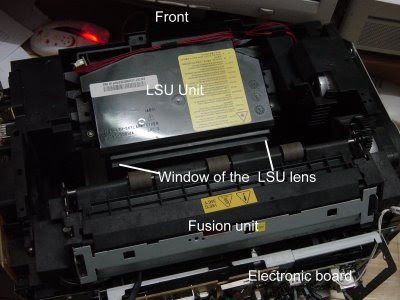
This is where the manual or the servicing guide wasnt very useful. The unit is hidden from view and it is located on top of the toner cartridge. A proper tool such as the dentists mirror would have to used to see the lens. The lens is protected by a rectangular plastic window of about 100 mm x 10 mm. (Picture shows the LSU with the printer cover removed)
How to clean this lens?
As the lens is made of plastic material, it may not be advisable to use any form of cleaning chemical that would attack the plastic. The recommendation is just to use a cotton wool without any chemical.
There are 2 ways to do this cleaning job:-
a) Without stripping the printer unit
1. Switch off the power of the printer
2. Remove the toner cartridge
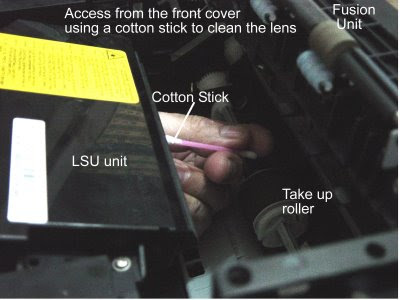
3. From the front cover, use finger to feel the rectangular window that protects the lens; paying attention not to touch the lens
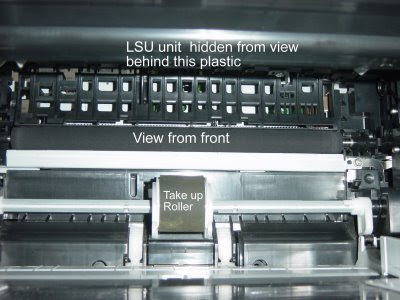
4. Use a clean cotton wool and insert it into the window. Gently clean the lens with horizontal movement. (picture shown with top cover removed)
5. Change the cotton wool if necessary until no more carbon or dirt is seen on the cotton wool.
b) Removal of printer cover to clean the lens
This is for those who are mechanically savvy . To remove the cover,
a) Switch off the printer and remove the printer cable and the power cable
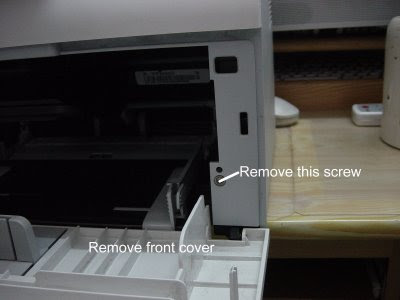
b) Remove the front cover from its hinges and unscrew the 2 screws in the front of the top cover;
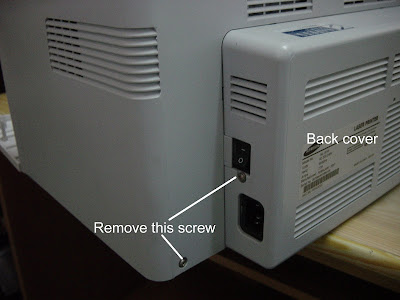
c) Turn the printer around to the back cover and unscrew the 4 screws that attached the top cover and the back cover to the printer
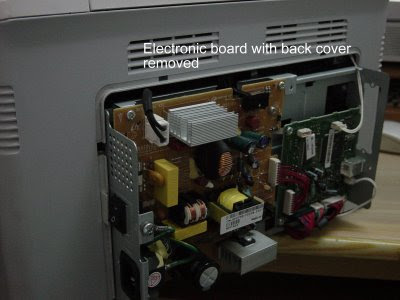
d) Remove the back cover gently to expose the electronic board. Try not to touch the electronic board
e) Turn the printer around with the electronic board facing towards you and use your left and right hand fingers to slightly ply open the bottom part of the top cover where the 2 front screws were located; at the same time, try to gently lift the top cover off the printer. The top cover should come off from the printer in one piece
f) Locate the LSU and clean the lens with cotton wools
g) Reassemble the covers in reverse order.
FAQ
What is this LSU unit?
It is the “printer head” of the printer. Instead of emitting ink, the LSU emits a laser beam, directing it at the drum of the toner cartridge so that electrostatic charge can be transferred onto the paper to form a “temporary glue” to pick up the carbons as the paper passes through the drum.
Why need to clean the unit?
Sometimes, when we move our printer around with toner cartridge still inside, some toner powder could have fallen on to the lens of the LSU. This will weaken the laser beam and prevent electrostatic charge being transferred onto the paper; as a result, the printing either got missing characters or blank vertical lines.
Where is this LSU unit located?
This is where the manual or the servicing guide wasnt very useful. The unit is hidden from view and it is located on top of the toner cartridge. A proper tool such as the dentists mirror would have to used to see the lens. The lens is protected by a rectangular plastic window of about 100 mm x 10 mm. (Picture shows the LSU with the printer cover removed)
How to clean this lens?
As the lens is made of plastic material, it may not be advisable to use any form of cleaning chemical that would attack the plastic. The recommendation is just to use a cotton wool without any chemical.
There are 2 ways to do this cleaning job:-
a) Without stripping the printer unit
1. Switch off the power of the printer
2. Remove the toner cartridge
3. From the front cover, use finger to feel the rectangular window that protects the lens; paying attention not to touch the lens
4. Use a clean cotton wool and insert it into the window. Gently clean the lens with horizontal movement. (picture shown with top cover removed)
5. Change the cotton wool if necessary until no more carbon or dirt is seen on the cotton wool.
b) Removal of printer cover to clean the lens
This is for those who are mechanically savvy . To remove the cover,
a) Switch off the printer and remove the printer cable and the power cable
b) Remove the front cover from its hinges and unscrew the 2 screws in the front of the top cover;
c) Turn the printer around to the back cover and unscrew the 4 screws that attached the top cover and the back cover to the printer
d) Remove the back cover gently to expose the electronic board. Try not to touch the electronic board
e) Turn the printer around with the electronic board facing towards you and use your left and right hand fingers to slightly ply open the bottom part of the top cover where the 2 front screws were located; at the same time, try to gently lift the top cover off the printer. The top cover should come off from the printer in one piece
f) Locate the LSU and clean the lens with cotton wools
g) Reassemble the covers in reverse order.
Available link for download